There’s an easy way to build custom GPTs.
When I first wrote about this eight months ago, I was trying too hard. It’s easier than I thought back then. So we’ve updated this article and today we are sharing a new way to make a custom GPT that you can use almost without typing.
A process-focused custom GPT starts with your best prompts. It’s actually an evolution of your best prompts. In fact, it’s the evolution of any workflow in the AI era.
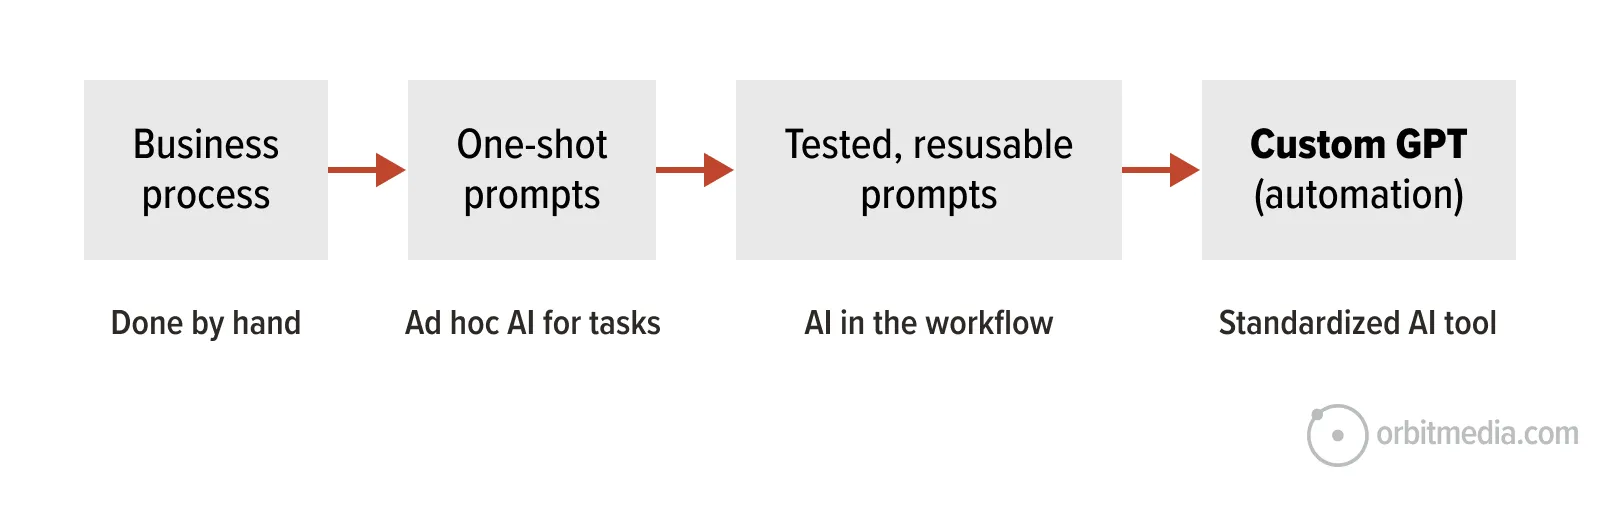 That’s the transformation. The manual done-by-hand process is supported by one-shot prompts (AI for tasks). Then those prompts get tested and improved, becoming reusable prompts (AI in the workflow). Then finally, those polished prompts get combined into an automation like a custom GPT (AI as a tool).
It’s not just the next step in your process, it’s the next step in your AI skillset. You already know how to make prompts. Today you’ll learn to transform those prompts into automations.
In a hurry? Skip to minute 4:40 in this step-by-step video and watch me make a custom GPT in real time:
Note: We’re showing how to make custom GPTs within OpenAI’s ChatGPT, but you can use this same method to make Gemini Gems, Claude Projects or Copilot Agents. There really is no difference.
Why build a Custom GPT?
If the task is done more than twice, or if your process that has multiple steps with involving multiple ad-hoc prompts, you have an opportunity to make a little tool with big benefits:
- Custom GPTs are easy to reuse and share
Use them anytime; share them with anyone. You need a paid account (ChatGPT Plus) to create one, but the people you share it with don’t need anything at all. Just the link. Once they click it, they’ll see the custom GPT in their left-side menu. They click it there or just typing the @ sign in any prompt. - Custom GPT standardize your best processes
Standards are good for quality, performance and efficiency. When you codify a process within an automation, your best practices are built into the tool. Custom GPTs support the high-skilled workflows of less-expert users. They are reusable tools for repeatable systems.
Make one that does something you’re already very good at. This is your opportunity to turn your personal expertise into codified best practices.
Step 1: Decide the goals, inputs and output
Let’s plan. The first step in building anything is to define the goal. Because we’re building an AI automation, we’ll also define what the user gives it (inputs) and how the AI responds (outputs). I’ve borrowed this little framework from AI pioneer, Christopher Penn. The examples are from the custom GPT I built in the video above.
- Define the goal
What’s the purpose of this automation?
Example: Auditing donation pages to improve conversion rates. - Define the inputs
What does the GPT need to do its job? Does it need a simple link? Or a screenshot? Or an uploaded file?
Example: A screenshot of a donation page. - Define the outputs
What kind of results should it generate?
Example: Gaps, recommendations, emotional triggers and conversion ideas.
Step 2: Improve your prompts
First, get your prompts ready. These are the building blocks for your process GPT. Better inputs mean better outputs, so polish the prompts before adding them to the automation. AI can help.
AI can write better prompts than you. That realization is a breakthrough for some marketers. AI is expert at editing, and your prompts need to be edited. AI can spot gaps, and your prompts may have a few. AI is great for new ideas, and your prompts may benefit from a fresh perspective.
Once you try this, you may discover every prompt you’ve ever written was just a draft.
Ask ChatGPT to improve your initial prompt. Then keep talking to it to see if your prompt could be even better.
Prompt Improvement Prompts
Improve the following prompt for clarity and structure:
[paste in draft prompt]
Generate two short outputs using this improved prompt, then critique them. What worked well? What could be improved to get more precise, useful, or original results next time?
Suggest three alternate versions of this prompt: one for creativity, one for analytical precision, and one for brevity. Briefly explain when each version would be most effective.
The difference is dramatic. The AI edited version of your prompt will be direct, unambiguous and well structured. Compare:
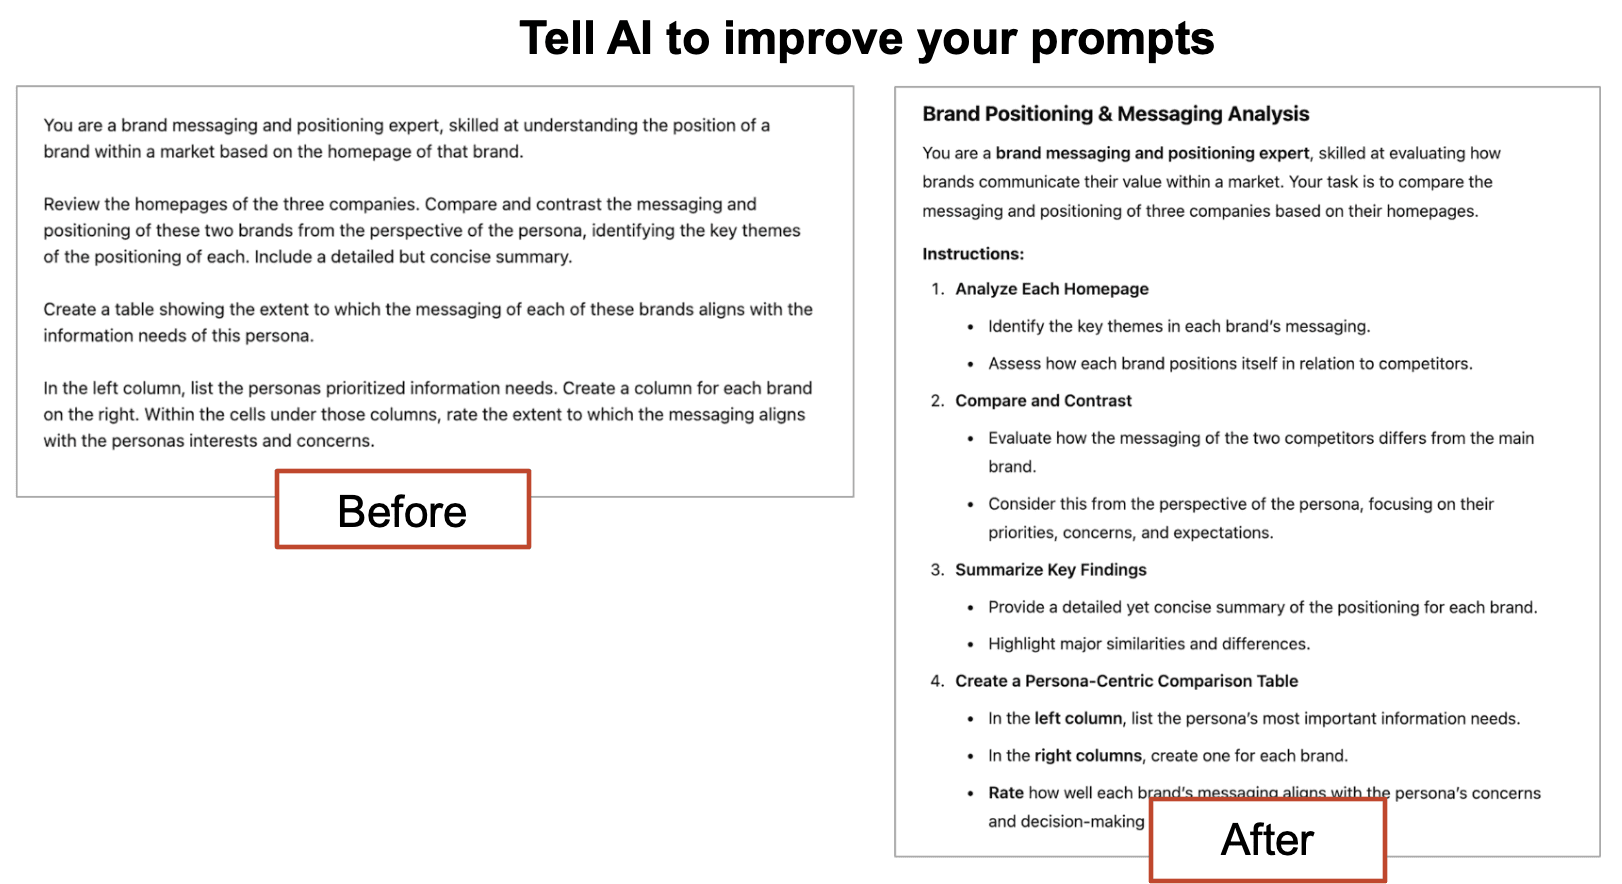 Test the new prompt by opening a second browser and running it side-by-side next to the original. Review the output carefully. Iterate and revise. Tell the AI how to adjust. Collaborate with the AI on the prompts, back and forth, testing and revising, until the prompt is final. Remember, this prompt will become part of the tool. Take the time to get it right.
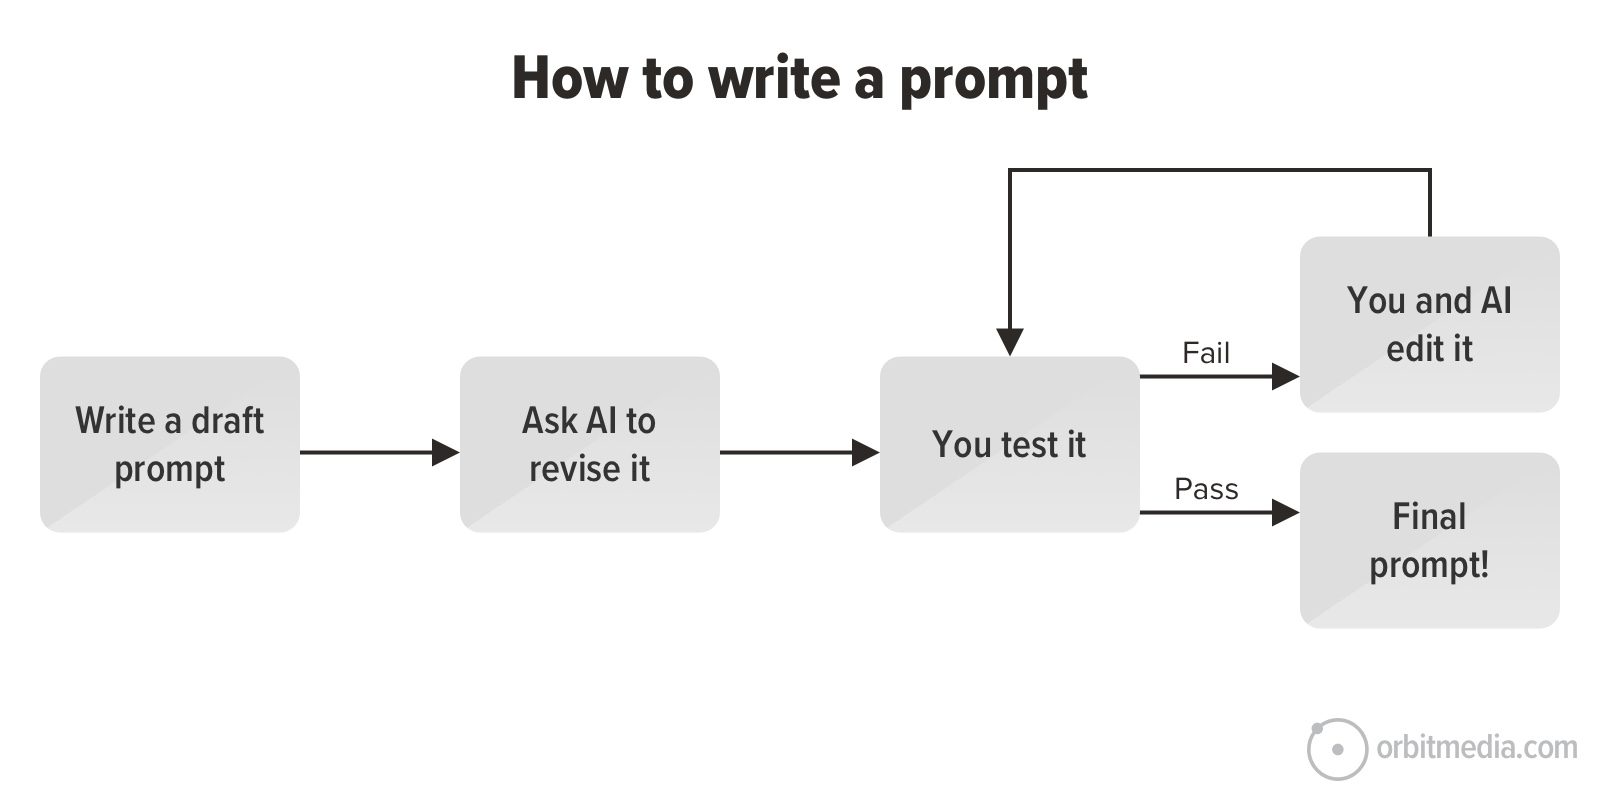
Step 3: Tell Chat GPT to build your Custom GPT
Once your prompts are polished to perfection, you’re ready to build. Click the “Explore” button on the left, then click the “+ Create” button in the top right.
You’re in! Here are the basics of the interface:
 This is an extremely accessible technology. Microsoft Word has 10x as many buttons.
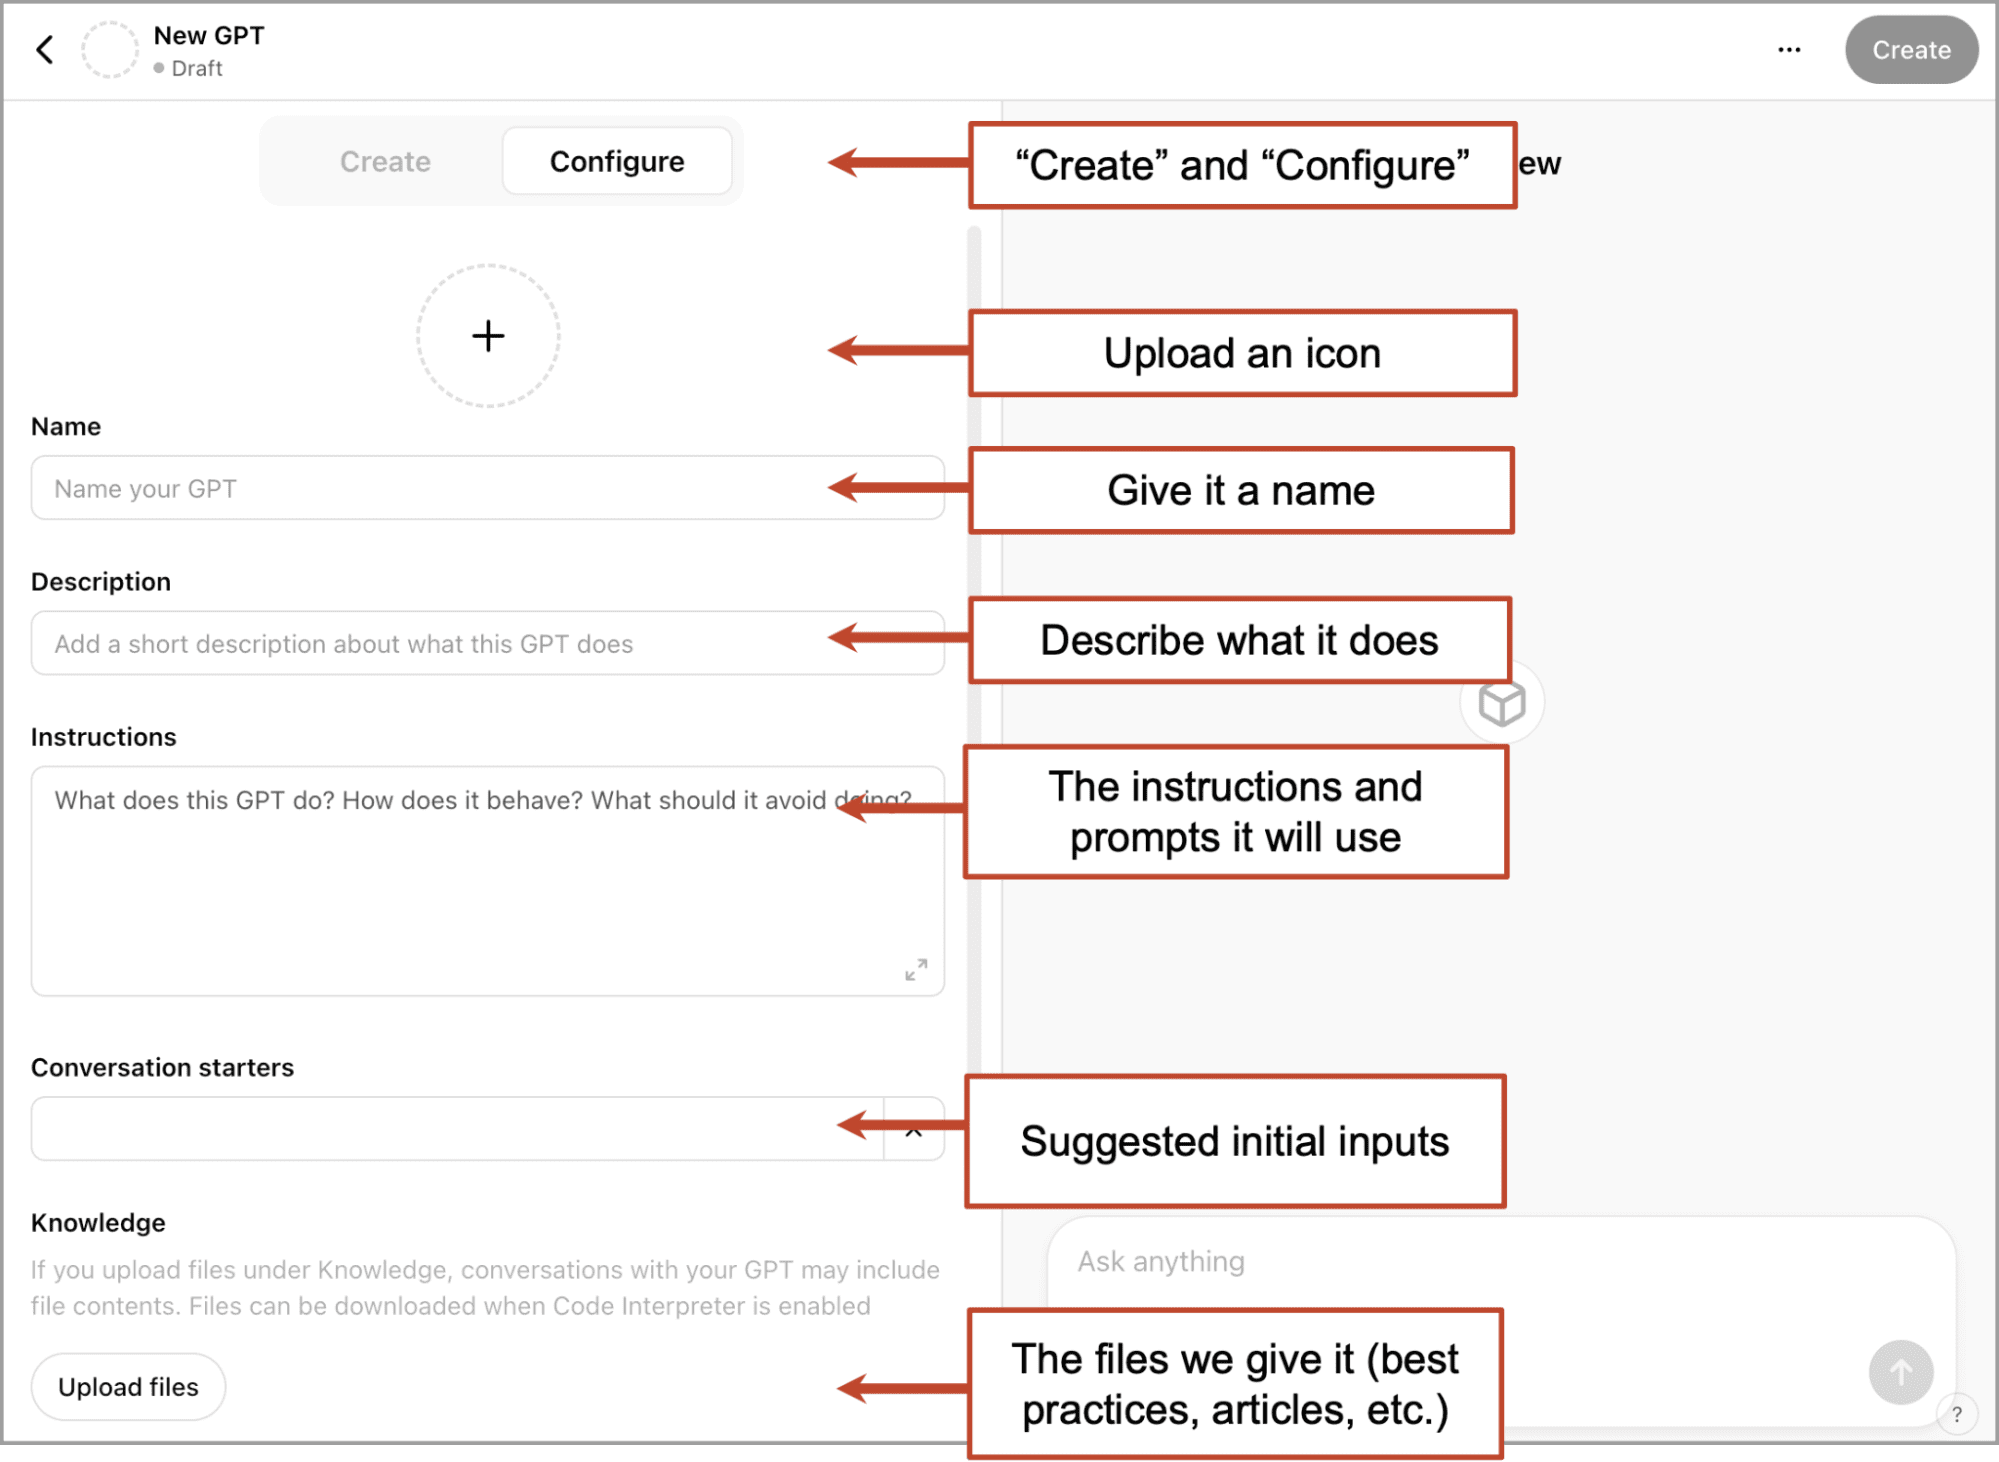
At the top, you’ll see there are two modes: Create and Configure. The easy way to build a custom GPT is to start with the Create mode.
Start in create mode
Let ChatGPT make the first draft. It will write the initial instructions for you. You can watch me do this in the video above.
I highly recommend using your voice for this. Give your hands a break and hit the dictate button. You can also use a speech-to-text software like Wispr Flow, which lets you revise as you talk, adds a bit of formatting (makes bullet lists) and works in any tool you use, not just in ChatGPT.
Tell it what you’re making together. Tell it the goals, inputs and outputs of your GPT. Then paste in your refined prompts one by one.
Move to configure mode
Once it’s done setting itself up, check its work. Go to Configure mode, open the instructions and see what it made. Get under the hood. Look closely and fine-tune the instructions
- Review the prompts (if it made edits you don’t like, fix it)
- Set the recommended model (use a thinking model for analysis and audit processes)
- Uncheck features (you probably don’t need Image Generation. Canvas? More on that below)
- Upload knowledge files (optional, but it’s helpful if you provide some relevant articles and guides)
- Add conversation starters (but you really don’t need these for a process-focused GPT)
If you’re building a GPT that helps with writing, leave Canvas mode checked and add an instruction to use Canvas mode. This will turn on the word processing mode, which puts the conversation on the left and the document on the right. The user and ChatGPT can both edit the writing and work on the writing together.
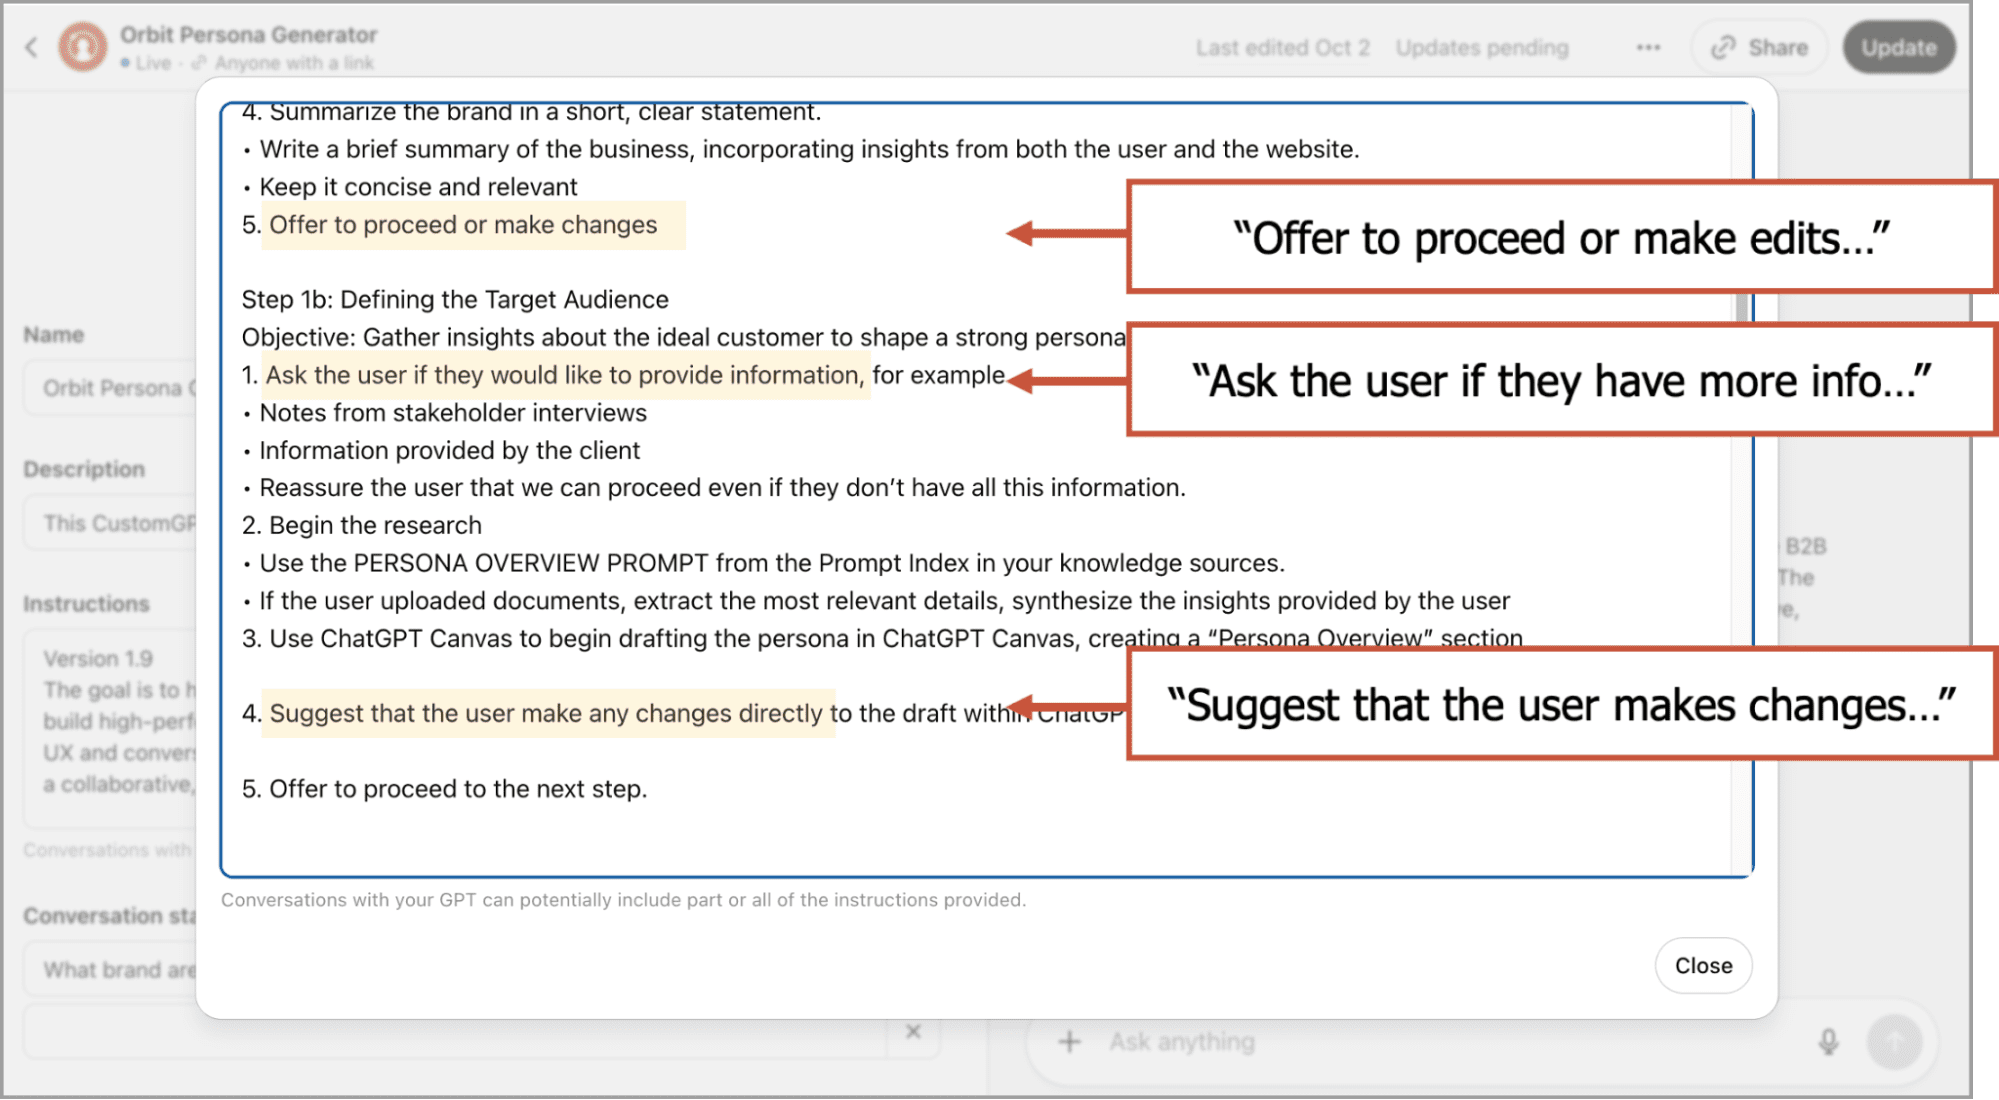
If you want your custom GPT to collaborate closely with the user, ask the AI build into little speed bumps so it pauses and asks the user for input between steps, rather than just running through the series of prompts without stopping. This keeps us from trusting the AI too much. It keeps us involved in our work.
Here’s what the instructions for a collaborative GPT look like:
Note: There is an 8000 character limit in the custom GPT instructions field. You can get around this limit by moving your prompts into a separate file (I call this a “Prompt Index”) and uploading it to the knowledge sources. Then have the instructions call up the prompts in sequence. Just as software triggers functions, your custom GPT triggers prompts from the Prompt Index.
The language in this instructions box is everything. This IS the custom GPT, unless you uploaded some knowledge sources. A custom GPT is just a pre-filled set of system instructions. This actually makes it portable. Want to try it as a Gemini Gem? Copy and paste it over. Test to see the difference in the underlying LLMs.
That’s it. You have a custom GPT.
 |
Leslie Carruthers, The Search Guru“Build a GPT that builds your GPTs. If your GPTs are only as strong as their instructions, don’t leave that to chance. I built a “Custom GPT Builder” that helps each team member define their audience, tone, goals, and use cases—then outputs a ready-to-paste system prompt. The result? Dozens of GPTs that are all aligned, all on-brand, and all driving better-quality output across the board.” |
If you like that idea and would like to see it in action, try Dillon Dixon’s GPT Architect. It’s a custom GPT that guides you through the steps to build GPT instructions.
Step 4: Test your Custom GPT
Time to test. It’s not done until you’ve tried it and you’re happy with the responses. Testing is tedious, but if you expect this to be a useful tool for an important process, it’s critical.
Run through a real use case with live inputs. You can do this in the “Preview” window on the right, or by clicking “Update” in the top right and then “View GPT.”
In preview mode, you can make edits between tests without even leaving the page. Use “create” to tell it to make adjustments. It will update the instructions. Use “configure” to fine tune the instructions.
Give it the initial input. Watch how it handles the steps in sequence. How does it look? Spot any issues? If so, it’s likely one of these:
Problem: The AI responded in ways that you don’t like or ignored part of the instructions (didn’t meet the goal, too many emojis, didn’t use a table, etc.)
- Fix: In “Configure” mode, update the instructions by hand. Usually, telling AI what you specifically DO want is more effective than telling it what you DON’T want.
- Fix: In “Create” mode, tell it the problem and ask for suggestions. Once you agree on a fix, tell it to update the instructions.
Problem: The AI didn’t fully complete the task or it oversimplified.
- Fix: In “Create” mode, tell it the problem. Ask if the prompts are overloaded. Suggest that it breaks up a single step into multiple steps with multiple prompts. This is called chunking.
- Fix: Set a “thinking” model as the recommended model.
Problem: The AI gave you more or less than you wanted. (ie. You wanted many recommendations, but it only gave you five)
- Fix: In “Configure” mode, update the prompts to tell it what you want more specifically (ie. “Provide at least 10 recommendations”)
Problem: The AI wandered off. It lost focus on the process.
- Fix: In “Create” mode, tell it to update its instructions to make sure it stays on track. Tell the AI to keep moving within the process. It will add constraints to itself that should help.
Test it again.
Keep testing and fixing. It will likely need several revisions before it works properly and consistently. You are a programmer now. This is your code. Debug it. Keep working on it until it functions as intended. If it’s glitchy, users will complain.
Depending on how ready my prompts are, most of my custom GPTs take 1-2 hours to build. Most of that time is spent testing and revising.
Step 5: Polish, publish and share
Upload a logo, decide the final name and tidy everything up.
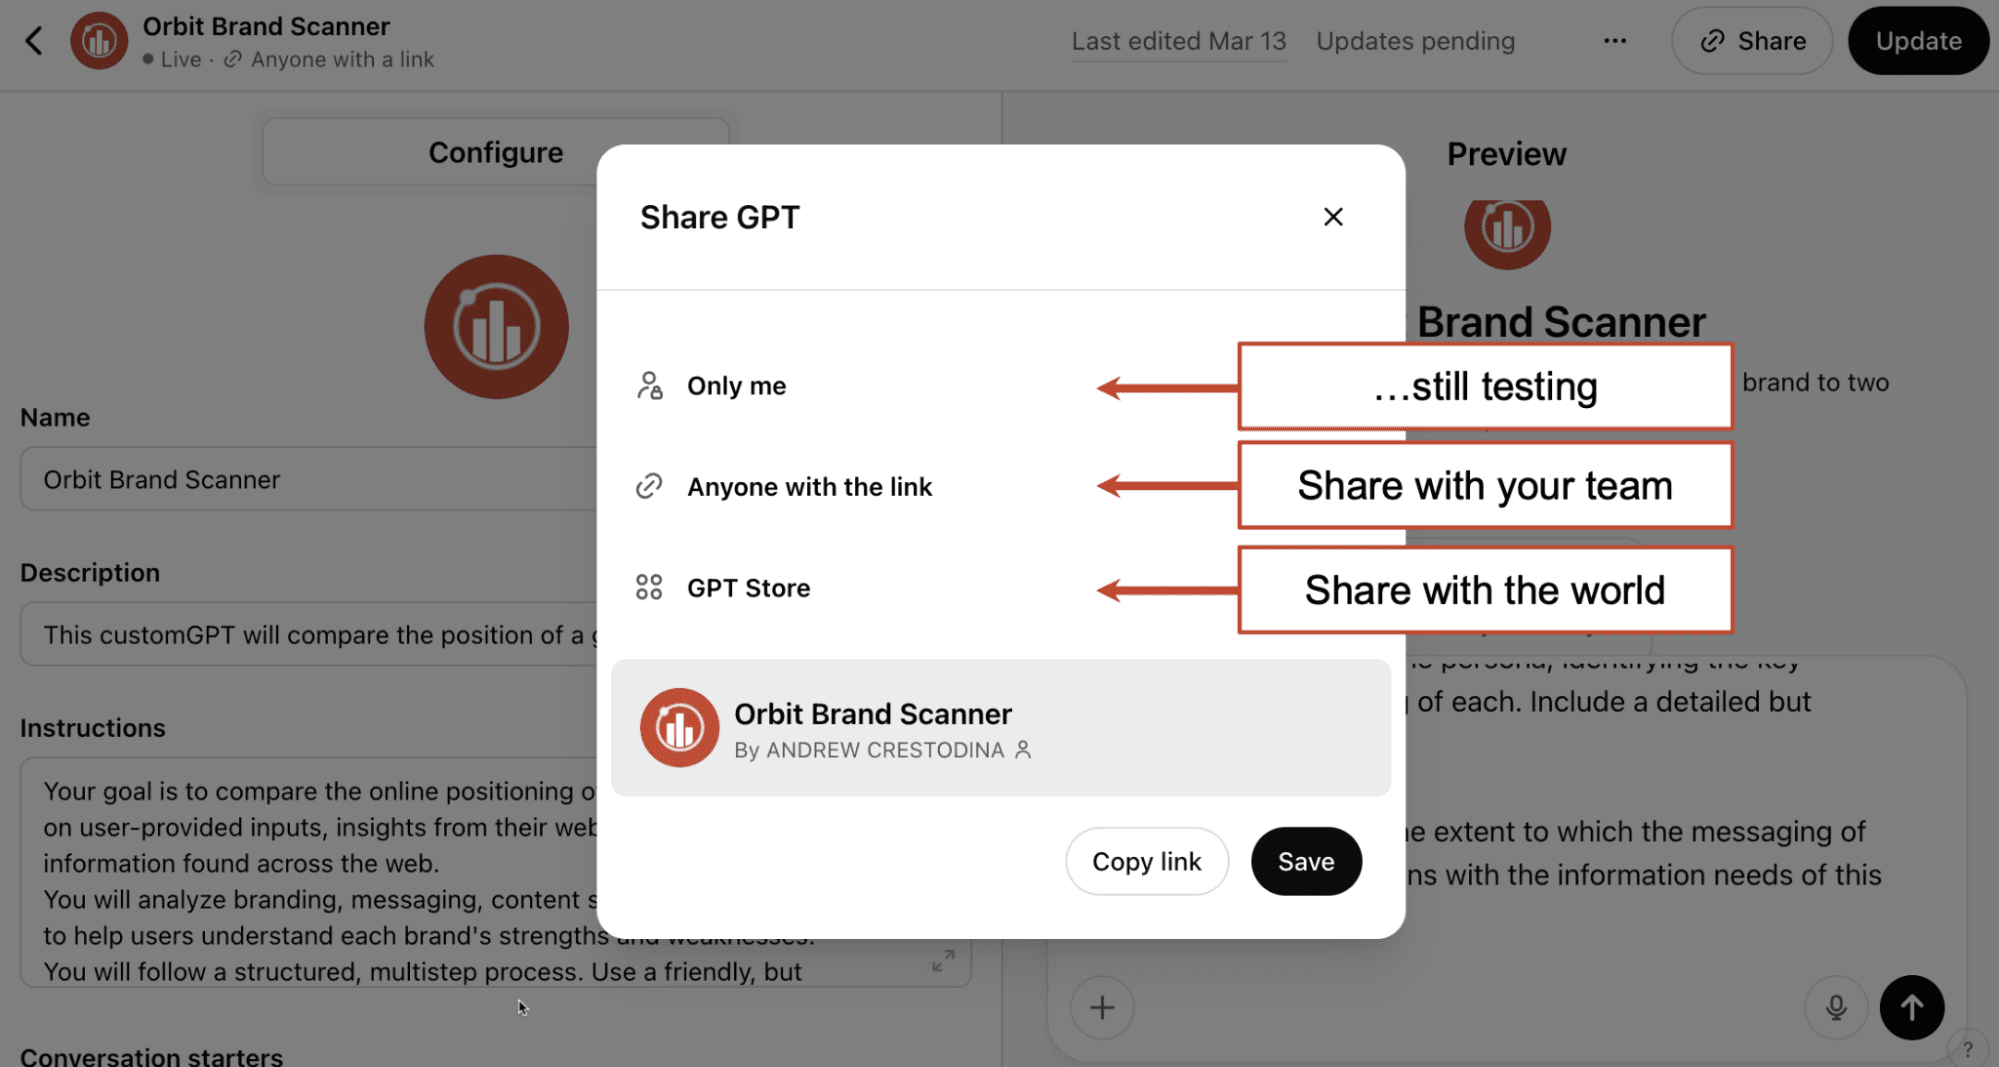
It’s complete. Share your new custom GPT by clicking the share button and then changing permissions to “Anyone with the link.” Then copy the link and pass it along to people on your team. They don’t need a ChatGPT Plus account to use it. Ask them for feedback. Revise again.
If your new tool supports a documented process in your business, add the link to those SOPs (standard operating procedures) or training materials. Show people when to use it, how it works, where to give feedback to the creator and the importance of being skeptical of the outputs. No one should trust AI completely.
Anytime you (or anyone) wants to use it, you can find it in the sidebar menu of ChatGPT. Or just type the @ sign into ChatGPT and you’ll see all of your custom GPTs as options.

Example: The Donation Page Auditor GPT
In the video above, I make a custom GPT that audits donation pages on non-profit websites. It looks for missed opportunities to trigger urgency, make emotional connections and build trust. The plan:
- Goal: Improve nonprofit donation page conversion.
- Input: Full-page screenshot of the donation page (use Snagit or GoFullPage)
- Outputs: Audit report with actionable insights and a heatmap.
It’s a two step process that uses two prompts: a persona generator prompt and an audit prompt that checks for alignment with the generated persona. I revised and tested the two prompts first, then used create mode and built it with my voice.
The process is short and sweet, perfect for this quick example:
- Generate a quick donor persona.
- Evaluate the donation page from the persona’s point of view.
- Recommend changes, suggest new ideas.
The testing process was reviewing the response carefully to see if it met my own standards for conversion optimization. I also wanted to see new conversion ideas that I hadn’t thought of before.
It works pretty well! This is ready for a workflow. A designer, copywriter or conversion optimizer could add this audit step to their process.
Know a non-profit struggling to convert visitors into donors?
Feel free to share this custom GPT with them: Donation Page Audit GPT
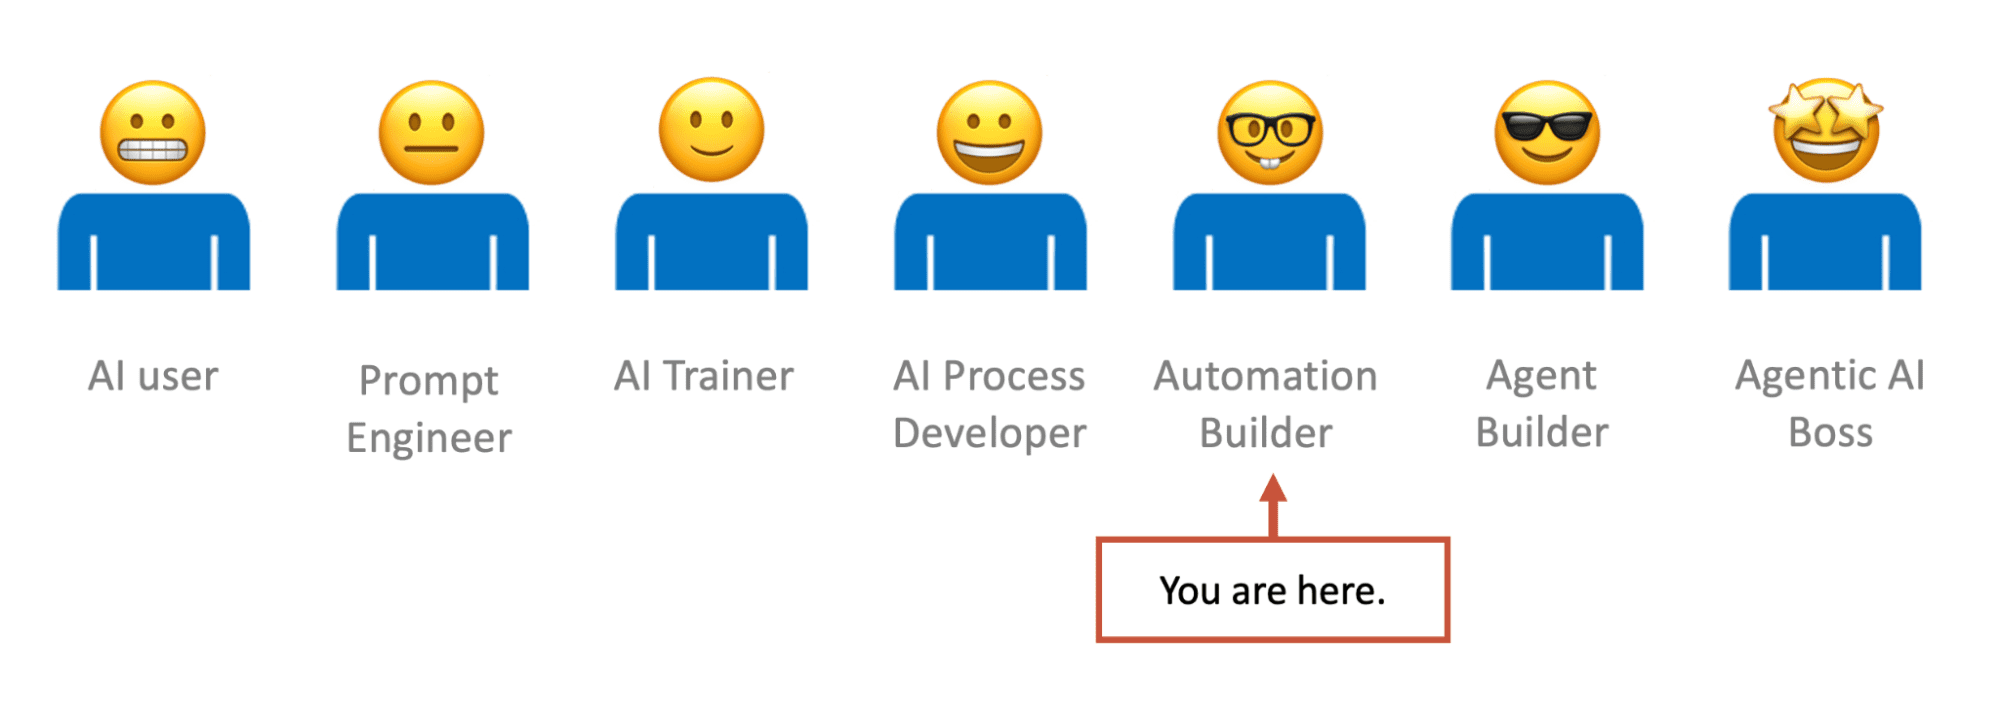
Your AI skillset just leveled up
You were Prompt Engineer, now you’re an Automation Builder. You have moved up to the next level on the AI Proficiency Scale.
Here’s the hidden benefit: building automations reduces your anxiety about AI. Disruption changed to opportunity. You are skilled in this new technology. You have more control over your destiny in the AI era.
Bring your custom GPT to a meeting and your coworkers will think you’re a sorcerer. Talk about it in a sales meeting (or job interview) and you’ll distinguish yourself from the competition.
Got a friend who’s overwhelmed by AI? Share this guide with them. We’re all in this together.
Coming soon…
This guide was all about making a PROCESS GPT, but there is another type: The ADVISOR GPT. Rather than a series of prompts in sequence, the Advisor GPT is open ended. It provides advice on a topic. It could even be a clone of yourself.
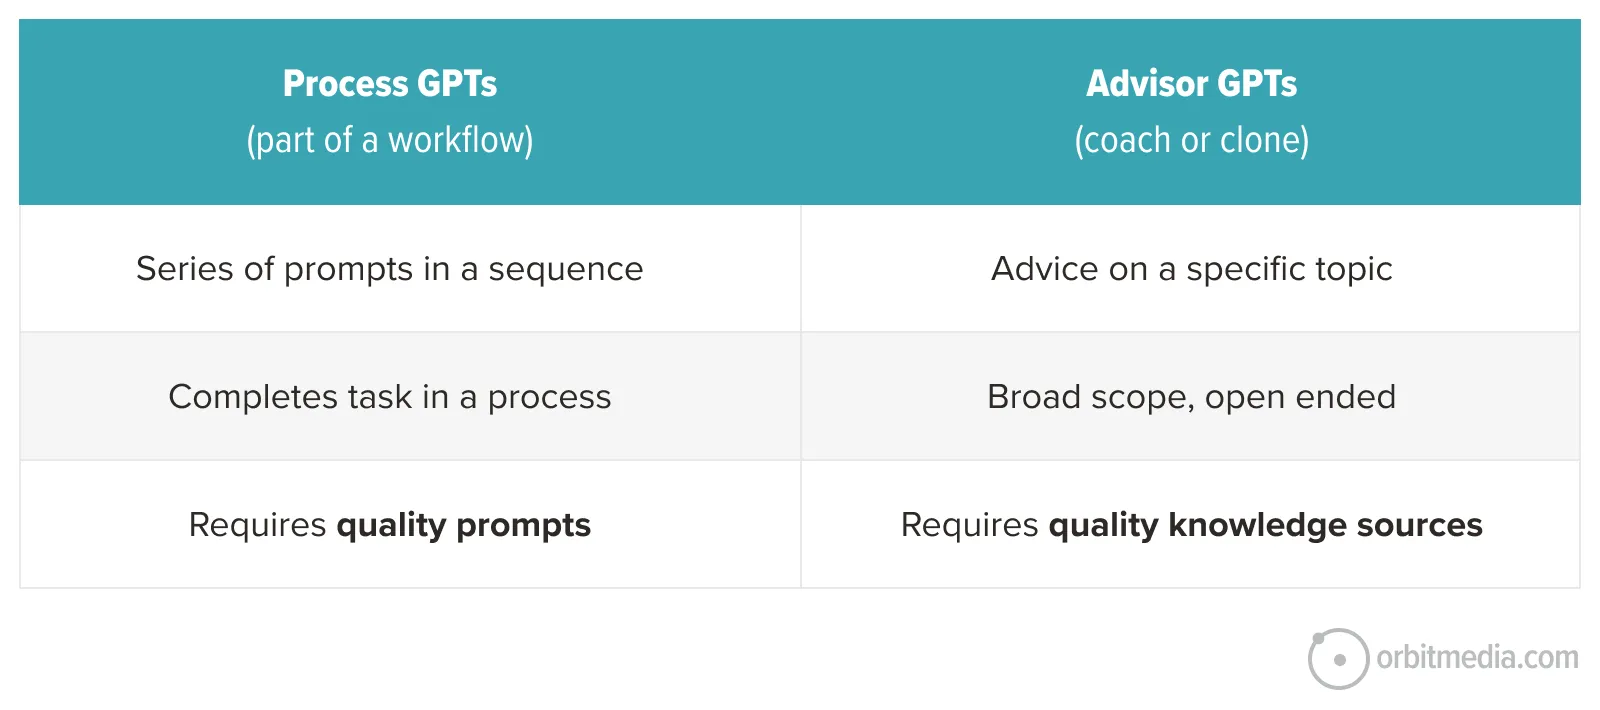
In a future article/video, we’ll show you how to make an Advisor GPT and how to share it with the world, growing brand awareness and traffic from other ChatGPT users.