If you have Google Analytics set up on your website, you are one of the tens of millions of websites using the most popular analytics tool on the internet. This post and video may help you confirm that it’s set up properly.
If you don’t have it set up, you are just 52 clicks away. Here’s your complete guide on how to set up Google Analytics quickly for the most accurate reporting possible.
Let’s answer a few basic questions and then go into the step-by-step instructions. But first, here’s the complete video:
How does Google Analytics work? What does it track?
Just now, when this page loaded, a tiny bit of Javascript was triggered. It talked to five tiny cookies on your device, then it reported back to Google and stored the information in our Google Analytics (GA) account.

Through this clever combination of Javascript and cookies, Analytics tracked that the page was viewed.
It doesn’t know who visited or what they looked at. It doesn’t know how long they were on the page unless they went to another page and triggered the Javascript again. There’s a LOT that Analytics doesn’t track and there’s a lot of inaccurate data in Google Analytics.
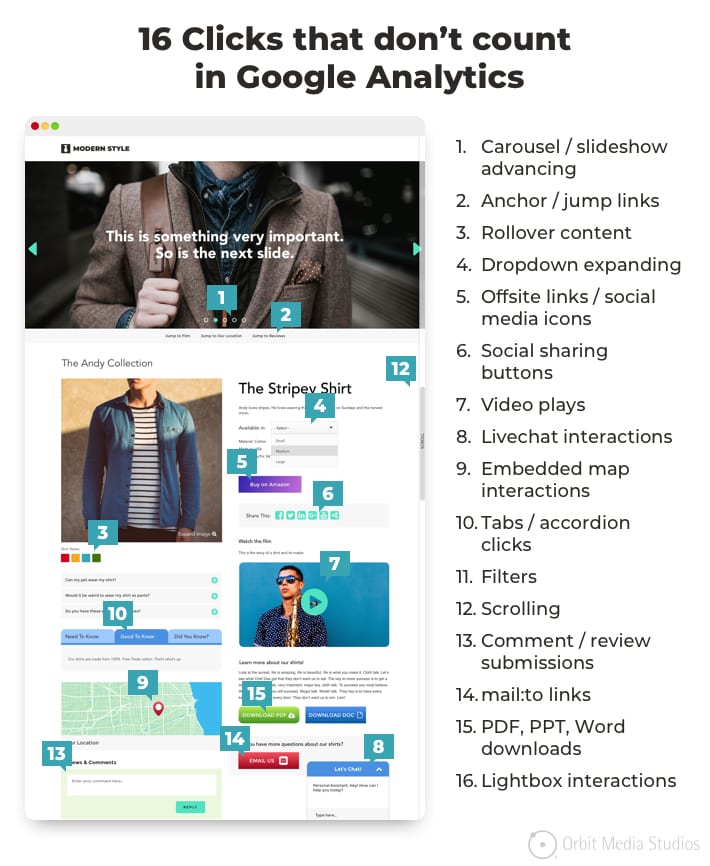
By default, it doesn’t track anything except when pages load. So any “non-pageview interactions” is not tracked unless you use “event tracking.” But that’s a topic for another article.
Here’s a quick list of 16 types of clicks that aren’t recorded in Google Analytics.
There’s a lot it doesn’t know. But it’s still a good way to track visits and visitor behavior. And how much does it cost? Nothing. Google Analytics is free.
So let’s get GA set up right! And for fun, let’s try to do it all in 52 clicks. Easy peasy, right? Let’s go.
But first…
The Analytics JavaScript needs to be on every page of your website, in the <head> tag section of the code.
For years, marketers added the Google Analytics tracking code using a plugin in their content management systems. Today, the best way to add (and manage) the code for Google Analytics (and every other tracking tag) is Google Tag Manager.
You put the Universal Analytics number (UA-XXXXXX) that’s found in your Google Analytics property into Google Tag Manager (GTM), and add the GTM code to your website. You can find details here.
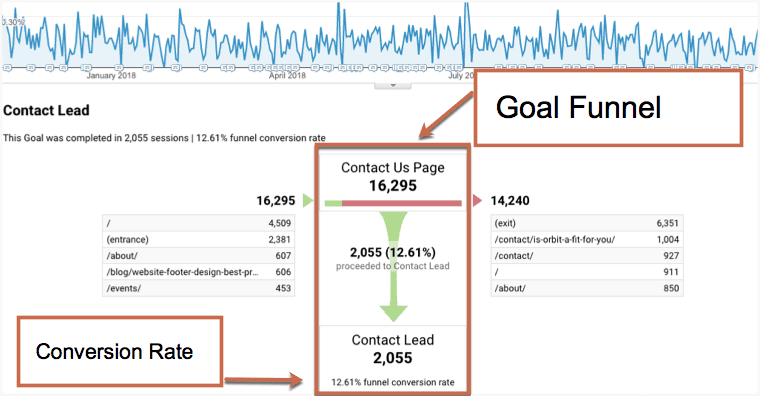
1. How to set up goals in Google Analytics
When a visitor takes an action, they “convert” into a lead, subscriber, registrant, job applicant, donor, etc. Each conversion is a success for the brand and the website. But because websites are built in different ways, Google Analytics doesn’t know what success looks like. So we have to tell it.
Here’s how to set up each type of conversion as a goal in 12 clicks:
Note: We’re going to create “destination” goals, which are thank you pages or receipt pages for ecommerce. If visitors who take actions see a thank you message, rather than a separate thank you page with it’s own URL, setting up goals won’t be so simple. You’ll need to set up event tracking. There are at least 14 other good reasons to have thank you pages.
- Click the gear icon in the bottom left to go to the “Admin” section
- Under “View” in the right-hand column, click “Goals”
- Click the big red “New Goal” button at the top
- Enter in the name of your goal. For example: Contact Lead or Newsletter Subscriber
- Under “Type” select “Destination” then click “Continue”
- In the Goal Details section, enter the web address of your thank you page. Notice the suggestion under the field. Don’t enter the full URL with the domain name. Just enter the address of the page, such as “/thank-you”
- Under “Value” switch the toggle to On and assign a monetary value to your goal, even if it’s arbitrary. Setting a $1 value for each goal is perfectly fine.
- Under “Funnel” switch the toggle to On.
- Enter the page name and URL of the contact form (ie “Contact Page” and “/contact”) then under “Required?” switch the toggle switch to “Yes”
- Click “Save” and you’re all set!
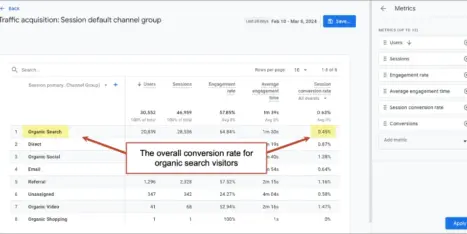
Note: All kinds of things can be set up as goals in Analytics. For example, a visitor spent five minutes on the website or a visitor visited three pages. I recommend against creating these types of goals unless you have a strong reason to do so. If you create lots of these less important goals, your overall conversion rate becomes meaningless.
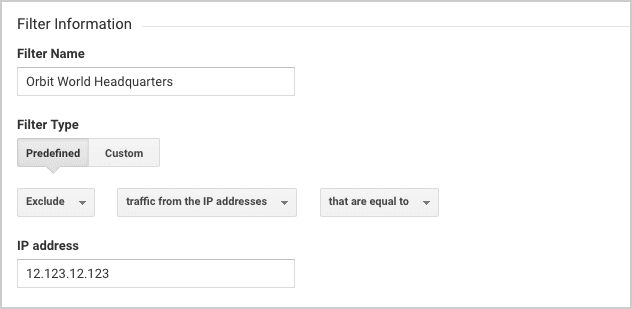
2. How to filter out traffic from yourself
Visit your site and that visit is recorded. You’re in your data. But you can filter yourself out by telling Analytics the IP address of your office. This is especially important for low traffic websites, where traffic from the website owners may be significant.
Here’s how to create a filter in Google Analytics in 11 clicks:
- Click the gear icon in the bottom left to go to the “Admin” section
- Under “View” in the right-hand column, click “Filters”
- Click the big red “Add Filter” button at the top > “Create new Filter”
- Name your filter (ie “Chicago Office”)
- Now set the three dropdown menus…
Change “Select Filter Type” to “Exclude”
Change “Select source or destination” to “traffic from the IP addresses”
Change “Select expression” to “that are equal to” - Now enter your IP address into the box
If you don’t have this memorized (who does?) find it just by searching Google for “What is my IP.” Just copy and paste that number into the box. - Click “Save” and you’re done!
Once complete, the filter should look something like this:
To confirm the filter is working, go to a deep, rarely visited page than look at the Real-Time report. See a visit to that page? If no, the filter is working.
Once in place, Google Analytics will forever be more accurate. You can do things like test your contact forms without affecting your conversion rate.
Note: An IP address filter only works if the IP address of your network doesn’t change. If your office or home network doesn’t have a “static” IP address, then your network is grabbing a new IP every time you connect to the web, and the filter won’t work.
Also, if you move offices, change internet providers or reset your router, your IP address may change and you’ll need to update your filter.
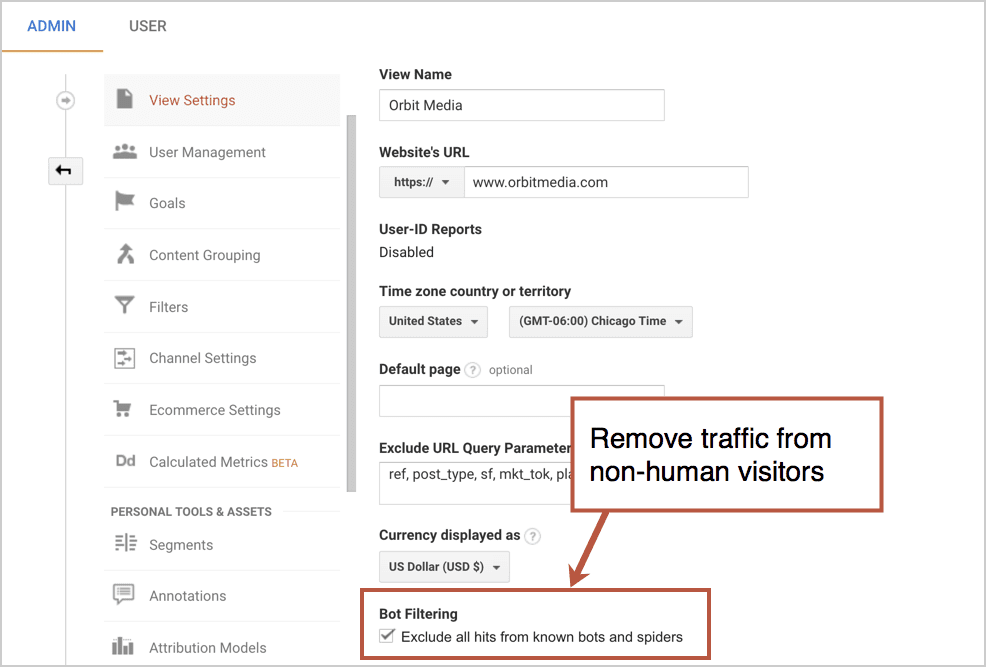
3. Exclude traffic from known bots and spiders
Why exclude traffic from robots and spiders? Because they aren’t your target audience. They aren’t even human. There are a lot of bots out there. The IAB/ABC keeps a long list of them. By default, Google Analytics tracks them as if they’re people. I think that’s weird.
Here’s how to get the known robots out of your data in 3 clicks:
- Click the gear icon in the bottom left to go to the “Admin” section
- Under “View” in the third column, click on “View Settings”
- Scroll down toward the bottom to “Bot Filtering”
- Check the box next to “Exclude all hits from known bots and spiders”
- Click “Save”
That’s it. Your data is now more accurate.
Tip! Before removing bot traffic or filtering out traffic from your office, make a new View called “Unfiltered” so you can have something to refer back to if necessary. Once traffic is filtered within a view, it can never be changed.
4. Setting up Site Search
That little search box on your website is a nice way to help visitors find things fast. But it’s also a powerful listening tool for you. If you set up the Site Search reports, you’ll learn what people are looking and if your site is missing important content.
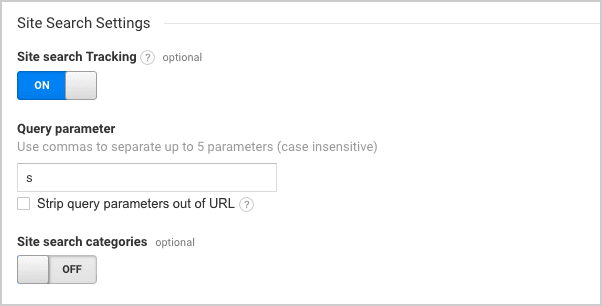
Here is how to set up the Google Analytics Site Search report in 7 clicks:
Step 1: Click the gear icon in the bottom left to go to the “Admin” section
Step 2: Under “View” in the third column, click on “View Settings”
Step 3: Scroll down to the “Site search Tracking” section. Switch the toggle to “On”
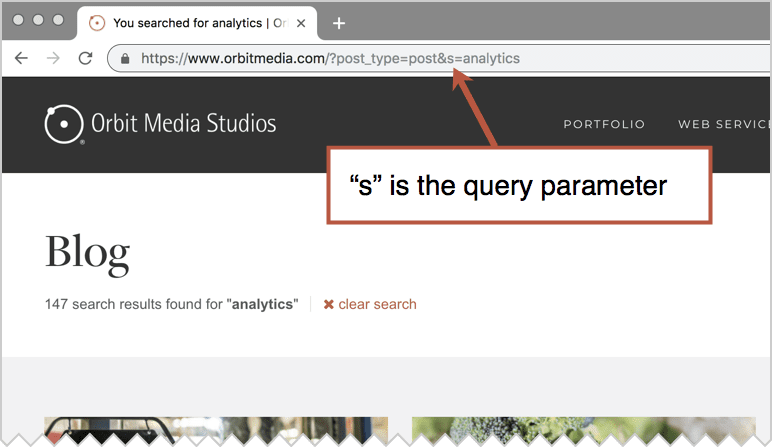
Step 4: Now enter your “Query parameter” into the box.
To find your query parameter, search for something using your search tool and look at the URL of the search results page. It will appear just before the keyphrase you searched for.
For example, a search for “Analytics” on this blog, shows this in the URL: https://www.orbitmedia.com/?post_type=post&s=analyticsSo for this site, the query parameter is the letter “s.” Other common query parameters are q, search_term and keyword.
Don’t see a query parameter when you search your site? If so, you may have “path based” programming behind your site search. You’ll need to set up a fancy advanced filter to see what people are searching for.
Step 5: Leave the box next to “Strip query parameters out of URL” unchecked and leave the “Site search categories” toggle off.
Step 6: Click “Save” and you’re good!
Once complete, it should look something like this:
Once set up, you are minutes away from discovering if content is missing from your website, if something is hard to find and if your navigation labels are confusing. This report is also a gold mine for new blog post topics.
Related: How to analyze the Site Search reports.
5. Connecting Google Analytics to Google Search Console
Google Search Console (GSC) is the sister tool to Google Analytics. It’s a valuable source of search-related insights. But the reports are a little harder to read, so it’s nice to connect the two so you can see the GSC data right there in your GA.
Once connected, you’ll get a set of reports in the Acquisition section. These reports show you the performance of your website in search engines. If these two are not connected, these reports are blank.
Assuming you’ve set up GSC and verified ownership, here’s how to connect Google Search Console with Google Analytics in 9 clicks:
Step 1: Click the gear icon in the bottom left to go to the “Admin” section
Step 2: Under “Property” in the second column, click on “Property Settings”
Step 3: In the “Search Console” section, click the “Adjust Search Console” button.
Step 4: From the dropdown, select the Search Console view like to associate with your Google Analytics account.
Note: If there is no dropdown, click “add” which will send you to GCS. As long as you’re logged into an account with access to the GSC property, select the relevant account then click “Save.” Once you get the Add association popup, click “ok.” This should take you back to Google Analytics.
Step 5: Click “Save.”
Once complete, the data won’t appear immediately. Check back later to find insights and then do some amazing blog optimization. If you’re in a hurry, all the same data is waiting for you in Search Console.
6. Adding Campaign Tracking code
This isn’t a one-time setup task. It’s an ongoing behavior. But it’s as important as everything else on this list because it makes your data more accurate and more meaningful.
Some of your actions are designed to drive traffic to a specific page through a specific channel. These are called “campaigns.” It could be an email, an ad, an affiliate link or any other effort.
If you do a little extra work while planning them, you’re Analytics will be a lot more useful. If you don’t, the visitors you worked so hard for (or paid so much for) are mixed in with everyone else.
For example, if you send email newsletters, but don’t track that traffic using campaign tracking code, you can’t see them separately. Those email visitors may appear in direct or referral traffic. Not good.
But if you add campaign tracking code, all of those visitors can be tracked separately and every one of their conversions can be attributed properly.
![]()
The difference is the campaign tracking code (aka UTM tracking code) on the links in the emails. The link is the same, but there are three bits of information added to the end: source, medium and campaign name. So a link like this without tracking code:
https://website.com/article
…gets the extra UTM tracking codes at the end
https://website.com/article?utm_campaign=nov-newsletter&utm_medium=email&utm_source=newsletter
It’s the same link, it’s just telling Google three things about where the visitor came from:
- Medium
- Source
- Campaign Name
Here’s how to add campaign tracking code to a link in 7 clicks:
You can do this from any URL Builder. Google, of course, has provided one of these, but it’s not the easiest to use. Here’s a nice URL Builder that we use.
- Enter the address of the landing page for the campaign into the URL field
- Enter the source: this is the specific origin of traffic (newsletter, twitter, facebook)
- Enter the medium: this is the specific marketing effort (fall-special, marketer-recruiting)
- Copy the new URL with the tracking code appended.
- Paste this URL into the campaign, wherever you are creating the ad, the post or the email
Tip! Always use lowercase letters. The source, medium and campaign will appear in Google Analytics exactly as you typed it here.
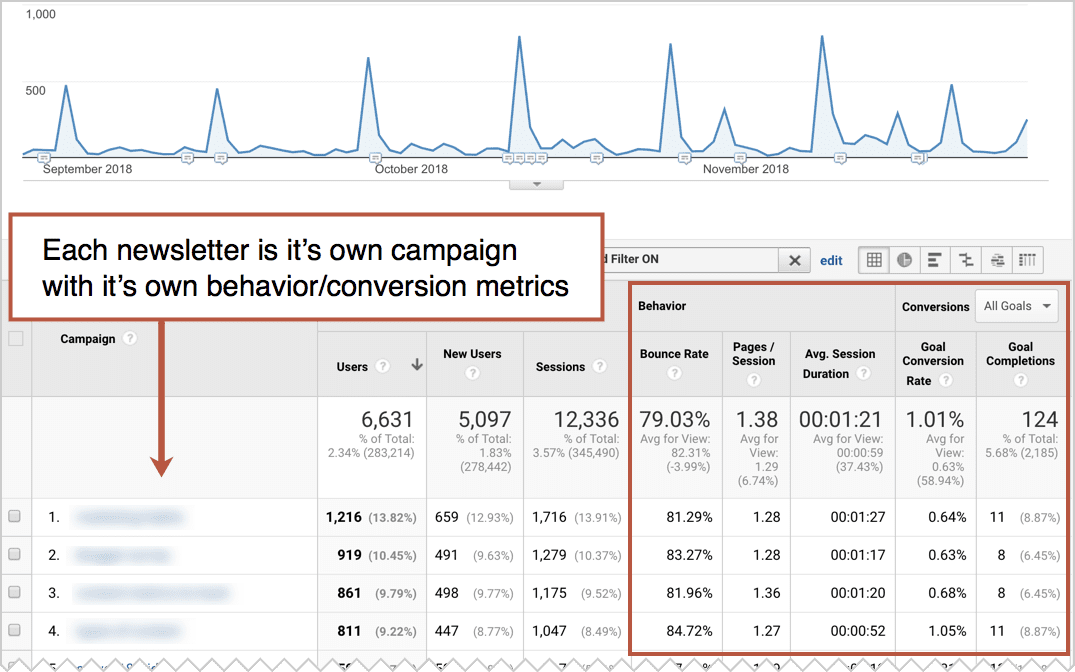
Once complete, all traffic from that campaign will be tracked separately. You can see how engaged those visitors were and if any of them converted. Here’s what the campaign report looks like for a brand doing email marketing.
Learn more about how to track campaigns, here is a helpful article from our own Amanda Gant.
Warning! Never add campaign tracking code to a link on your website. If you do, the true origin (source and medium) of the visitors who click on this link will be lost, because the campaign tracking code information will override the original source. This makes your Analytics less accurate. And it’s unnecessary. The flow of your visitors is available in other reports.
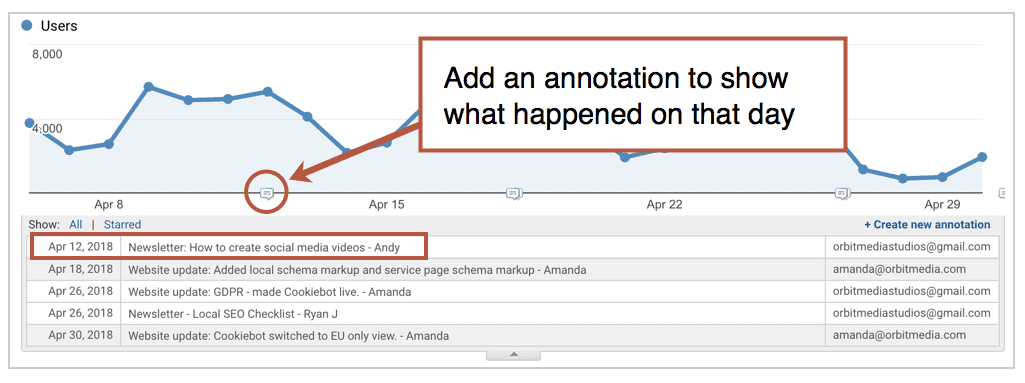
7. Creating Annotations
The final step! Let’s add a little note to indicate that we’ve made changes to our Analytics. This way, anyone who looks at this account later can quickly see what happened.
Why did traffic go down? Oh look, this annotation says a filter was created.
Why did the conversion rate go up? Oh look, this annotation says that a new goal was set up.
Annotations help your data tell stories. And that’s really what Analytics is all about: answering questions, finding insights, telling stories.
It’s just a little note that you attach to a date. It appears under the timeline of all reports.
There are five main reasons to add annotations.
- Website change: updated an important page, added a feature, redesigned
- Analytics change: changed or added a filter or goal, excluded a query parameter, etc.
- Advertising change: turned ads on or off, started or stopped recruiting, etc.
- Email sent: sent a newsletter or promotional message
- Press hit / Influencer mention: Someone loves us today!
Here’s how to add an annotation to Google Analytics in 3 clicks:
Step 1: Click on the tiny arrow on the tab below the timeline to open up annotations
Step 2: Click “Create new annotation” in the top right corner
Step 3: Choose the relevant date and type your note
Step 4: Click “Save”
Over time, your account will have a lot of these little notes. So here’s a tip for making them easier to scan through: start each type of the annotation with a few standard words. Use the bolded words from the list above as a simple naming convention. It will make things easy to scan through and find later.
Better data forever
We did it! We set up Analytics in 52 clicks, but who’s counting?
Your actions today determine where you will be in a year. Your Analytics setup today determine the quality of your data and insights next year and forever after.
Analytics is more than a scoreboard, it’s a decision support tool.
Do it well and your data will tell you better and better stories over many years. The outcomes of your actions will be clearly visible. That worked! That didn’t…
Do it poorly and you’ll be doing a lot of wondering, digging and detective work. What happened? Is something wrong with this report?
Ready to do some deeper analysis? Here are some next steps:
- How to optimize your blog post to rank like a champ
- How to do a content marketing audit using Google Analytics
- User Flow Reports: Find the top path through your website
- Is your website’s menu broken? Find out fast using the Navigation Summary report
- Google Analytics Reporting vs Analysis: Insights from 4 Reports