It’s hard building an audience. Think of all that work that goes into attracting visitors. But what about keeping them? Did we encourage them to stick around? Or did we squander the opportunity and show them the door?
They came, they read …they left. It may be happening on your site right now.
Not every exit is a bad thing. Sometimes it’s a fond farewell. The visitor bought something or became a lead and it’s time to move on. Other times, it’s bad. They leave right before they took action. Or they left because we suggested they leave.
Why do your visitors leave? Which exit links are they clicking? In this post, you’ll learn how to track website exits and offsite links. And in the process, you’ll learn how to set up event tracking with Google Tag Manager.
Tracking the three types of website exits
Visitors leave websites in three ways.
- They close the browser tab (or type another website into the address bar)
- They hit the back button
- They click on an offsite link or button
The first two are natural and impossible to avoid. But the third exit is different. It’s something you added to your website, during design or when publishing content. You put that exit sign there. You built that off ramp.
In Analytics, all three exits look the same. Yes, the exit page report shows the last page they visited. But there is no report in Google Analytics for tracking clicks on the exit links!
We’re fixing that today.
Let’s learn step-by-step how to track every click that takes visitors off of your website. We’ll do it by setting up event tracking and offsite link clicks using Google Tag Manager.
How to set up event tracking with Google Tag Manager to track exit link clicks
Here’s how to track all the clicks on all the links to other websites. We’re going to use Google Tag Manager (GTM) to set up event tracking. Hopefully, you have GTM setup. If so, you can just follow the steps below. If not, call your developer.
First, we’ll create a tag, then we’ll create a trigger for the tag. Finally, we’ll publish these to the live site.
- Log into Google Tag Manager
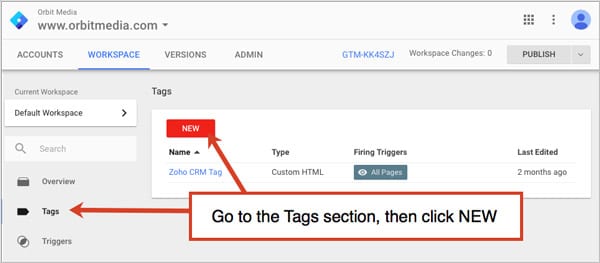
- From the Tags section, click NEW

- Name your tag. I called mine “Offsite Link Event Tracker” Then click to choose the tag type.
![]()
- Select either Universal Google Analytics or Classic Google Analytics.
Note: If you aren’t using Universal yet, you should strongly consider switching. Google isn’t going to support Classic forever!
![]()
- Enter your Google Analytics Tracking ID
- Select “Event” from the Track Type dropdown
![]()
Don’t have your GA Tracking ID memorized? Who does, right? Look up it up in the Property > Tracking Info > Tracking Code section of the Google Analytics Admin area.
![]()
ProTip: Use a text-constant variable, such as {{Google Analytics Property ID}} instead of your specific tracking code for more flexibility later.
- Set your event parameters. All events in Analytics have three main parameters: Category, Action and Label. The beauty of Google Tag Manager is that you can just type these right into boxes. No need for help from a programmer.
We’ll set the category to “link”, the action to “click” and the Label to “Click URL.”
![]()
You’ll also have the opportunity to add a value to this event, but it is unnecessary for event tracking offsite links.
Note: if Click URL is not available, you’ll need to first enable the Click URL variable. It is a built-in variable, but it’s not enabled by default. It’s easy to do. Just go to the Variables section, click the red Configure button and then check the “Click URL” check box
![]()
- Next we’ll create a trigger for our event. You can do this from within your new tag by clicking to “Choose a trigger to make this tag fire.” Click the plus sign in the top right to create your new trigger.
![]()
- Name your trigger. I called mine “Offsite Link Click” Then click to choose the trigger type. Select “Just Links” as the type.
![]()
- You’re almost done. Now we just need to tell the trigger to fire whenever an offsite link, to another domain, is clicked. In other words, fire the trigger when the Click URL does not contain your website. That’s exactly how you set the triggers in the event.
![]()
…then click “Save.”
Site note: Here’s what you didn’t know about bounces
Before we look to check our exits in Analytics, we should explain something: This event tracking will affect our bounce rates.
This is because a bounce really isn’t a one-page session. A bounce is a one-hit session. A hit is any time data is sent to or from Analytics. Events are hits.
So if a visitor lands on page and clicks an offsite link before visiting a second page, they will no longer be counted as a bounce, since it was a two hit session. The first hit was the pageview and the second hit was the event.
Do we care that our bounce rates will look a bit lower now? Not really. We’re about to get some much more valuable insights.
So now I can track every click that leaves my site?
Yes! They’re waiting for you in the Event report in Google Analytics. Let’s go look. We’ll answer three, previously unanswerable questions.
1. Where are they going?
To see where your off ramps lead, go to Behavior > Events > Top Events. From here you’ll need to get to the “Event Label” dimension.
Remember when we set the event category, action and label? Those are the dimensions in this report. We set the category to link, the action to click and the label to be the clicked URL. So to see where visitor went (the clicked URL) we need to see the label.
You can get to this primary dimension by clicking “Event Label” at the top of the report.
![]()
You are now looking at a list of all the websites that you send traffic to. This is the opposite of your referral sources report! These are the sites for which you are a referral source.
2. Where did they leave from?
To see which pages have the off ramps that are getting clicked, go to Behavior > Events > Pages.
![]()
You are now looking at a list of all of your pages from which visitors click to leave. Not back button clicks or closed browser tabs. You have at least one exit link on each of these pages.
3. Which exit link did they click on from a specific page?
Now we’re going deep. This is real analysis. Because as usual, the best insights are one level deeper than whatever report you’re looking at.
Here’s an interesting question: which exit links are getting clicked on the home page? To answer this question, just click on the page, then set Event Label as the primary dimension.
![]()
The insights from these three reports should be obvious…
Wow, I’m giving up a lot of my visitors!
We all do. But remember, not all exits are bad. In the next post, we’ll share a complete guide on website exits, good and bad. And for those bad exits, we’ll give you tips for keeping your visitors around a bit longer.
But for now, here are three high-value, related posts keep your visitors on your site and flowing well.
- 7 Dead ends on your website: How to find and fix them
- 3 Internal linking strategies
- User Flow Analysis: How to find the “top path” through your website.
Big thanks (and an exit link) to the good people at E-Nor, who wrote Google Analytics Breakthrough, the book where I first found this technique. Highly recommended!


