When was a kid, I watched Bob Ross. He had a show in the 1980’s that taught you how to paint. I recently rediscovered it on Netflix. It’s somehow relaxing to watch this guy paint landscapes while describing his process in his serene voice. So calming …and useful.
Watching someone work is a good way to learn.
But when do you get the chance to watch a writer at work? Right now.
I’ve recorded myself writing a high-ranking blog post. It was a 4-hour process I’ve compressed into a 20-minute video, showing the process of researching and writing for SEO. It shows how to write a search-friendly article.
This article shows how to write a blog post that ranks high in a step-by-step process, useful for beginners and expert SEOs. In this example, I’m writing an article about bounce rates.
Did it work? Does it rank? In the last section, we share the results of that article. We’ll check rankings, traffic and engagement.
What you’ll need
Bob always starts by listing his paints. Let’s start with the tools:
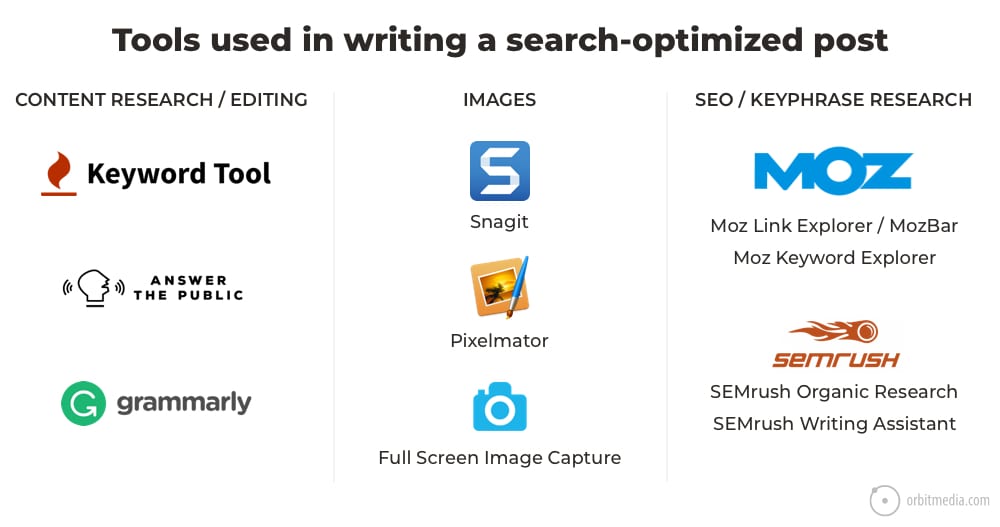
Beyond these, there’s also full-on content marketing software that helps manage content creation and promotion for everyone in the marketing department.
And now here is the complete process for writing for SEO.
For each step, I’ve added the timecode so you can follow along with the video.
1. Open my blank master content template
Timecode 0:10
My content marketing template is a Google Doc. It’s a great starting point because it forces me to plan the promotion of an article. Keyphrase research, social sharing, collaboration, internal linking are all built-in.
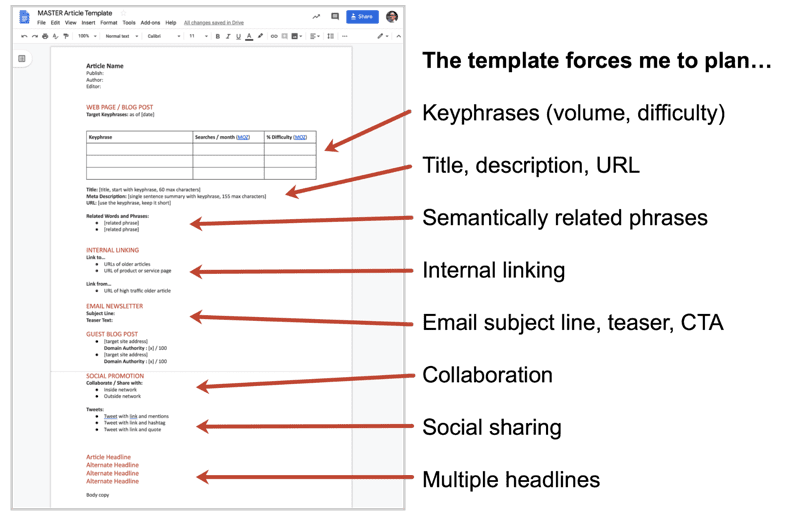
Want the template? You can find a link to it at the top of this post.
First I make a copy of it, rename it, then delete the sections that aren’t relevant (in this case, the guest blogging section, since I’m writing an article for my own site). Now I’m ready to start planning the promotion and organizing my ideas.
2. Find the subtopics and related questions
Timecode 1:45
To better understand the topic, I start by finding the most common, most relevant questions and related phrases. I do this research fast using two tools:
- Answer the public
I enter my main topic (“bounce rate”) in here and within seconds, it shows me 56 questions. I scan through to find those that align with my idea for the article. You can also use this fun keyword research tool. - Keywordtool.io
When you start searching for a phrase and Google makes suggestions, that’s inspiration for subtopics. If I were to type every letter of the alphabet, I could find them all. But that’s slow. So I use Keyword Tool to scrape them all out of Google at once. In seconds, it found 304 phrases related to my topic.
I add these as notes knowing they will likely become subheads. Some are added as “related words and phrases” at the top of the template. This will remind me to incorporate them into the article later.
Good formatting is good flow. And working in the semantically related topics is good SEO. So this up-front research will make it a higher quality, higher traffic article. I hope.
3. Planning the sections and subheads
Timecode 15:30
Now I’m setting up the structure, deciding what the sections and subheads will be. This is the outline. I start sketching out some paragraphs. The shape of the article is starting to come together. What’s in; what’s out.
I’m also looking for opportunities to add more elements. What should be in a good blog post? Contributor quotes, data and statistics, examples, links to other articles, bullet and numbered lists.
4. Reading and research
Timecode 19:00
I’m already familiar with the topic, so I don’t need to spend a ton of time reading related articles. But I’m not just looking for insights and ideas to add to my piece. I’m looking for experts to add contributor quotes.
So I’m searching for people, not just ideas. Later I’ll reach out to them and ask if they’ll write an original quote for my article (see step 9). Then they’ll be more invested in the piece and more likely to help share it.
An ally in creation is an ally in promotion.
As I find both people and ideas, I add them. Ideas go into the body. Potential collaborators get added to the planning notes at the top.
5. Keyphrase research
Timecode 22:20
Keyphrase research goes in the top of the template.
I always start by noting the date, because there’s a good chance I’ll revisit and rewrite this article again years from now. It’s always interesting to look back and see how keyphrases and their search volume change over time.
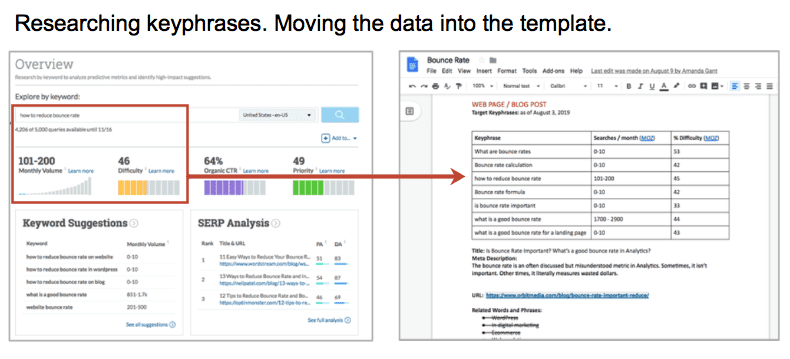
I enter keyword ideas into Moz Keyword Explorer, starting with the top questions and topics I found in step two. Moz makes more keyword suggestions, which I consider and capture.
Each possible phrase is added to the template, with its respective search volume and keyphrase difficulty in separate columns. Now I can see the competitive landscape, the opportunities, the possible winning phrases.
Note: This is not a keyphrase first approach to content marketing. I started with a blog post idea. There are SEOs that research keyphrases first and then choose a topic. That’s a very different blogging process …and a weird way to write. I believe the best content starts with inspiration.
Want more? Read our complete guide: How to Research Keyphrases
Timecode 29:20
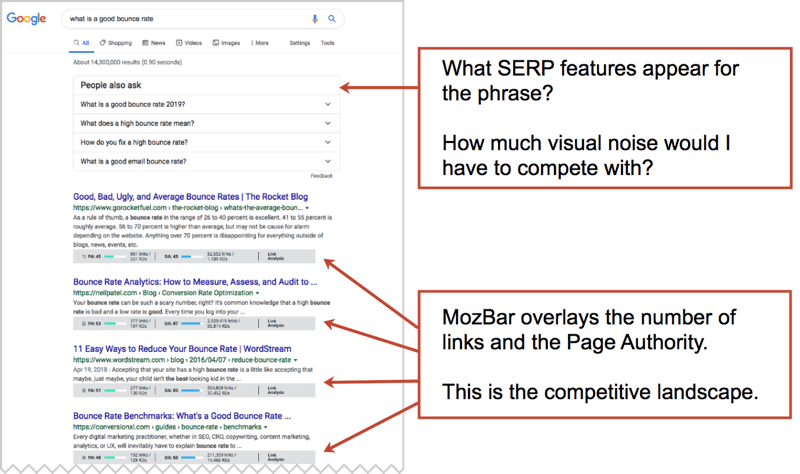
I’m not done picking a primary target keyphrase until I’ve actually searched for it in Google. I want to see what the SERP (“search engine results page”) looks like. Are there videos? What are the PAA (“people also ask”) questions? Who’s ranking?
I do this with a tool that shows the competitive metrics in more detail. It’s called MozBar.
Turn on MozBar and search for a phrase. You’ll see the link metrics (number of websites that link to the page) of every page that ranks, overlaid right on the search results.
In other words, it shows you at a glance if these are famous pages, loved and linked to by other pages on the web. Or maybe they’re not so popular, linked to by very few websites and easy to outrank.
Timecode 30:45
What is the likely Page Authority of this new page?
This is going to be a new article on a new URL. So I need to get a sense for what its Page Authority (PA) will be. I take a look at the Top Pages report in the Moz Link Explorer and dig deep to see what a low PA page on this domain (a page with few or no links) will be.
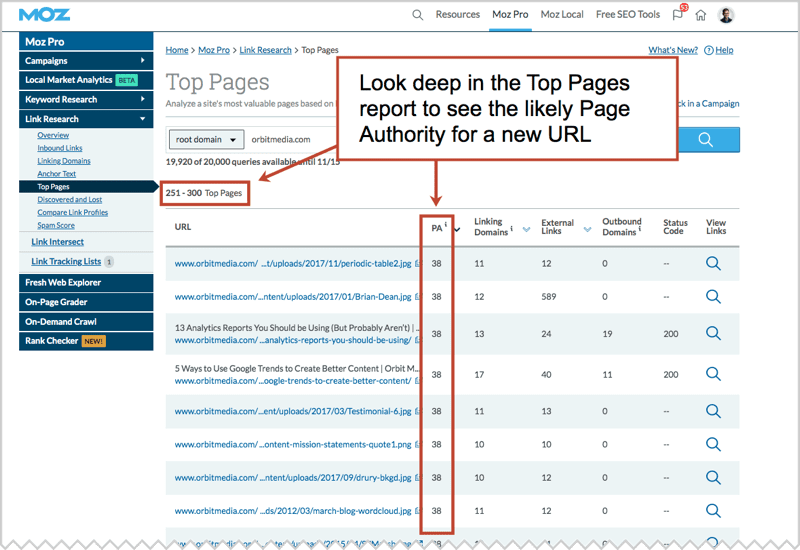
Looks like my page will start with an authority of around 38. So it’s quickly obvious that some of my possible target phrases are out of reach. They have keyword difficulties in the 40’s and 50’s.
After agonizing over the options, I’m going with the least competitive phrase on my list: “is bounce rate important.” That’s my best chance of ranking high fast.
Note: To successfully target a more difficult phrase, I’d need to build a big family of content (on-site and in guest posts), in various formats (guides, videos, infographics) and in collaboration with various experts. In other words, it this page would need to be part of a larger content strategy framework.
Timecode 32:25
Now that I’ve selected my primary keyphrase. I can really check the competition. I check all the rankings of the top-ranked page for my primary keyphrase. I do this by entering the URL of the number one ranking page into SEMrush. Voila!
Google seems to think that a great page on my topic should also be relevant for these other phrases.
I just found even more relevant subtopics and semantically-connected phrases, which I add to my template in the “related words and phrases” section. I’m fully prepared to rank like a champ.
6. Writing draft headlines (and social posts)
Timecode 35:00
The primary keyphrase needs to appear in the title and header of the article, so selecting the phrase and writing the headline happen at the same time. Time to start writing draft headlines, seeing how they might work, writing, revising, worrying, obsessing.
I’m mostly just imagining the potential reader and how they would read it.
- Are the benefits of reading specific? Explicit?
- Are there interesting words near the front?
- Does it trigger curiosity? Is it provocative? Unexpected?
- Can I work in any of Steve Rayson’s 3-word trigrams?
I need the keyphrase, but I also need the click. So I’m writing for both search and psychology. It’s hard.
Most of the draft headlines are expanded versions of the possible target keyphrases. Headlines that don’t make the cut are kept in the template as possible subheaders and social media posts (tweets).
7. Final selection of title, header and URL
Timecode 40:20
Here’s my final selection for the headline: Is Bounce Rate Important? What it means, When It Matters and 5 Ways to Reduce Your Bounce Rates
It meets all of my criteria:
- It’s very long (about 100 characters. It’s basically two sentences.)
- Includes the primary keyphrase (is bounce rate important)
- Includes a secondary keyphrase (how to reduce bounce rates)
- Includes several related words (Analytics, matters)
- Includes a number, a question and a specific benefit (it makes a promise to the reader)
Timecode: 44:00
Finally, the winner gets adapted into various forms, each with slightly different requirements:
- The <h1> header …the headline in it’s full length
- The <title> page title …a 60-character version of the headline
- The URL …short, simple and never includes a number
- The email subject line …doesn’t need the keyphrase, but needs interesting words at the front to avoid truncation in the mobile inbox
Now that the main elements are set, the rest of the article takes shape quickly.
8. Writing and image preparation
Timecode 1:00:00
Research and planning are done. Finally. It’s time to actually write the blog post. The next hour is spent developing content, both text and visuals.
Images are critical. It’s really hard to promote an article if it doesn’t have strong visuals.
The best images are charts with original insights. An article with a chart or graph is easy to mention in contributions to articles on other websites. This is one of several ways that images affect SEO.
This kind of blog post needs a lot of screenshots of Analytics. Each is lovingly created using Snagit. They’re marked up with boxes, arrows and callouts, then dropped into the draft.
Formatting is almost as important as pictures. I am constantly looking for places to add subheaders, bullets, bolding, links and, best of all, contributor quotes.
9. Gathering contributor quotes from experts
Timecode 2:11:00
It’ll be a better blog post if I add quotes from experts. It will also get shared more because they’ll likely help promote it on social media. It’s also good networking and good fun. Writing blog posts is an excuse to connect with new people and reconnect with old friends.
I’m adding quotes from three experts in this article: Oli Gardner, Angie Schottmuller and Ayat Sukairy. We’re all friends already, so I’m really just emailing them questions and contributions invites.
I also could have taken the opportunity to make new friends with benefits.
- Knowledge: Experts I’d like to learn from but have never met
- Traffic: Social media influencers who are like to share with much larger audiences
- Sales: Prospects at companies I’d like to someday work with
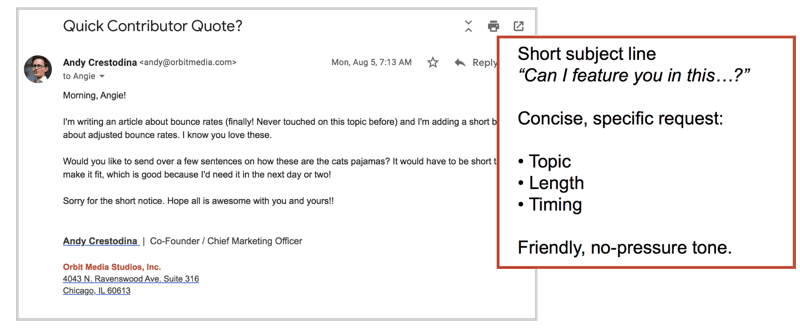
Gathering quotes requires me to plan farther in advance because I need to give people time to respond. A week at least. The email request is specific about topic, timing and length. It makes it easy for them to respond or decline.
As the quotes flow in from the contributors over the next week, I add them to the notes at the top. Later I’ll work them into the final draft.
10. Collaboration with the design team
Timecode 2:43:00
A lot of the “writing” time for an article is actually spent planning and preparing images. The final article has 16 images, including three headshots of people used for contributor quotes.
Two of the images needed a little love from a professional designer. I’m blessed with an in-house design team at our company. Jantzen is the man. He needs time to do his best, so I get this to him as early as possible. We give him total freedom on selecting header images.
These two were tables with column headers, so I put the final touches on the content. Then sent these out for design help, by taking screenshots and sending via email.
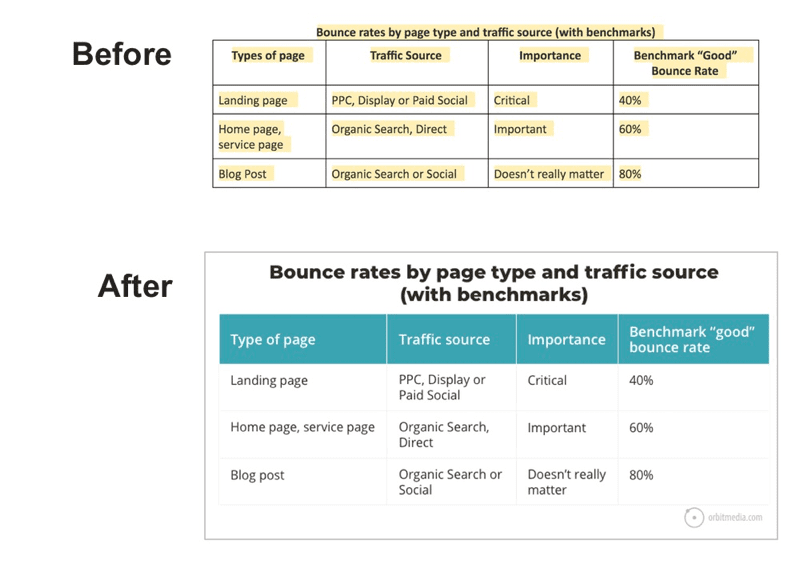
Jantzen uses blog image best practices, using landscape aspect ratios and large headers (so they look good when shared) and also brand colors and watermarks for images with original data.
Amanda, the editor-in-chief of the blog, may also ask for design help. She often coordinates this by simply adding comments into the Google Doc and tagging Jantz.
11. Semantic SEO check and adding detail
Timecode 2:50:40
My goal is to target the topic, not just the keyphrase. Yes, I have a primary keyphrase, but I need to cover all of the related subtopics if I expect to rank.
If you’ve never used this SEO copywriting technique, check out our post on semantic SEO.
First, I check to make sure I’ve incorporated each of the related words and phrases I discovered during research. I copy them from the list above and press control+F (Find) to see the instances of each phrase in the headers and body copy. If the phrase doesn’t appear, I look for opportunities to add it.
This often means expanding the article by adding details about that subtopic or answering unanswered questions. Working in these phrases forces me to add value and create a more detailed article.
Applying semantic SEO to your process makes you a better writer.
12. Length check, links and writing the final draft
Timecode 3:02
After setting the article down for several days, I pick it up again for the final push to the final draft.
Word count check! I have no goal of writing long or short, but let’s see where we are. Using the Word Count feature of Google Docs, I see that I’m at 1700 words. That’s fine.
I still have a section to add. It’s the practical, how-to conclusion about reducing your bounce rate. The title promised this so it has to be good. Like several other sections, it has its own numbered list. Formatting is all-important.
TimeCode 3:07
I’ve been linking from this new post to older articles, but I also want to link TO this new post FROM older articles. To find those opportunities, I type this query into Google… site:orbitmedia.com “bounce rate”
In seconds I see every page on my domain that mentions bounce rates. I pick a few and add them to the notes. Later during the editing process, these pages will be updated to link to this new post. That will help pass a bit of page authority to this new blog post.
Is this a new idea for you? Check out this guide on internal linking for more details.
13. Final on-page SEO check
Timecode 3:53:00
I use the SEMrush SEO Writing Assistant to make sure I’ve covered the topic and included all of the related phrases. It’s a Google Doc add-on that compares my article to the other articles that rank high for my target keyphrase.
I start by creating a new Google Doc and copying my article into it. I don’t want the tool to analyze my research and notes, so I just copy in the headers and body copy.
Pro Tip! You can make a new Google Doc by typing “doc.new” into the Chrome address bar.
Next, I turn on the SEO Writing Assistant from the Add-Ons menu. It quickly gives me some basic analysis (originality, readability, etc.) but I’m here for semantic SEO recommendations. So I click the “Get recommendations” button and enter my primary and secondary keyphrases.
The tool goes to Google and looks at the other URLs that rank for these phrases. It generates a list of the phrases commonly used in those articles. If the phrase is already used in my article, it’s green. If not, it’s white …until I add it and then it turns green.
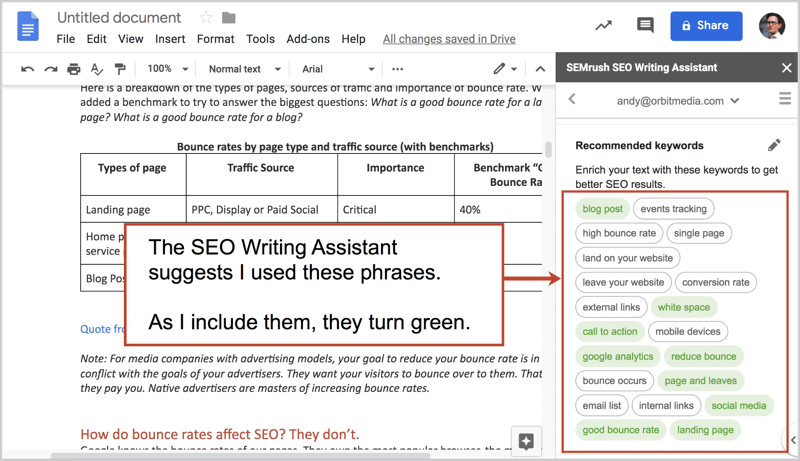
Now I know that it’s as good as the best …or at least it’s not missing relevance for anything that the other top pages include.
Timecode 3:59:00
Finally, I plan the email newsletter, spending a full 10-minutes considering possible subject lines, teaser texts and calls to action. It’s worth the time because email is high-stakes. Once you hit send, you can’t change the subject. Everything about this article can be edited later except for the email!
Ship it!
Whew! That was a lot of work. Here is the final article: Is Bounce Rate Important?
Let’s break it down the cost (time) and the benefits (metrics).
Time breakdown
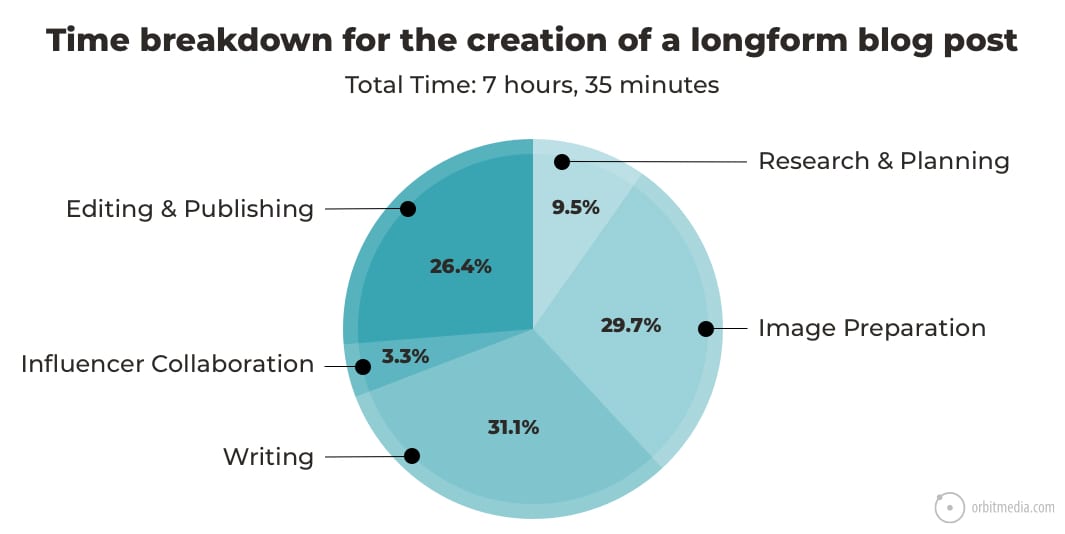
I spent just over 4 hours on this post. Beautifying the images took Jantzen about 90 minutes. Finally, Amanda spent about 2 hours editing, publishing the blog post in WordPress and getting the email newsletter setup in ActiveCampaign.
The total time was 7 hours and 35 minutes.
Sound like a lot? It was a lot less time than it took to create the article you’re reading now. Here’s how all of that time breaks down into categories. Notice how just 31% of the time was spent actually writing the article.
 |
Jay acunzo, founder, MARKETING SHOWRUNNERS“Instead of thinking, “I need to write a blog post today,” think, “I need to edit a blog post today.” That’s what the process really is. So, when it’s time to plan or to write, pick a thread from your backlog, and pull. Research, outline, draft, think, interview, and generally muck about, all with the same aim: writing a crappy draft. Then, ideally with some time in between these two actions, return to the draft and improve it.” |
3 months later… How’s she doing? Let’s check the results
Rank
If you update an article, you can often see ranking changes within days. But when you write a new post, it can take weeks for it to start ranking. This post was a slow burn. It took 7-8 weeks before it appeared on page one of Google.
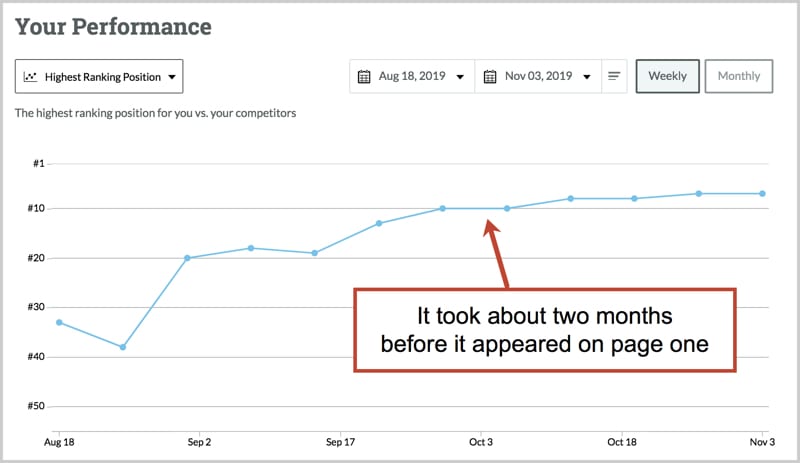
Its current rank for the primary keyphrase (“is bounce rate important”) at the time of posting is #4.
Email Newsletter
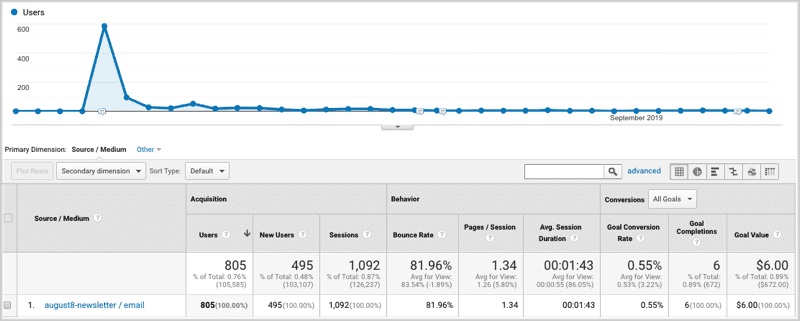
The email had a 21% open rate and 5% click through rate. That’s about 800 visits. Here’s the campaign report in Analytics for the first 30 days.
Traffic
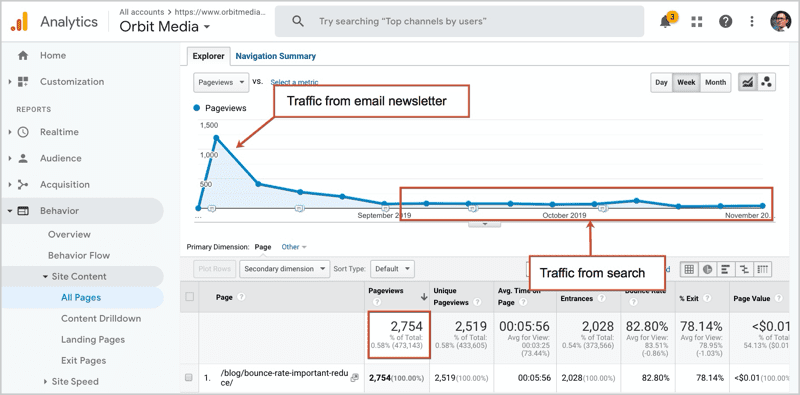
The post is starting to get a trickle of traffic from search. I expect this to climb as it gradually ranks higher for more phrases.
Engagement metrics
Here’s how people are engaging with the content itself.
- 18 comments
- 240 shares
- 6-minute average time on page
- 80% bounce rate …if you read the article, you know this doesn’t bother me a bit!
Social engagement was measured with Buzzsumo. Note: this tool groups all Facebook likes, comments and shares into one number. It also doesn’t show LinkedIn engagement, which LinkedIn no longer shares.

Next Steps:
To keep improving the ranking of this post, I’ll need to do a few things:
- Get this article mentions by other websites
That will likely be through contributor quotes to other people’s content. Guest posts are another good approach. - Write more content on the topic
We are planning to publish some research showing bounce rate benchmarks. That article will naturally link back to this one. - Keep it updated
I can adjust the keyphrase usage and relevance based on its current rankings, but it’s already such a detailed article, I don’t think that will help much. But I will definitely revisit this topic in a year or two and rewrite it (without changing the URL) to make sure it stays one of the best pages on the internet for its topic.
We hope you enjoyed seeing the entire process for writing blog posts, from beginning to end. Feedback? Suggestions? Let us know with a comment!


