Data is better when you share it with friends.
Sharing Google Analytics access is something that consenting marketers do everyday. But it needs to be done responsibly. Grant too much access and you add risk, too little and you add work later on.
It’s about trust.
Here’s a quick guide showing how to share access to your Google Analytics, with step-by-step instructions for various levels and permissions.
First, confirm you have the “Master Key”
You own your Google Analytics, not your agency, not your web developer. It’s your website, your visitors and your data. No one should limit your access or tell you it’s not yours.
Even if someone set it up for you, you should have total access. You should have the ability to add or remove anyone’s access anytime. Think of it as the master key.
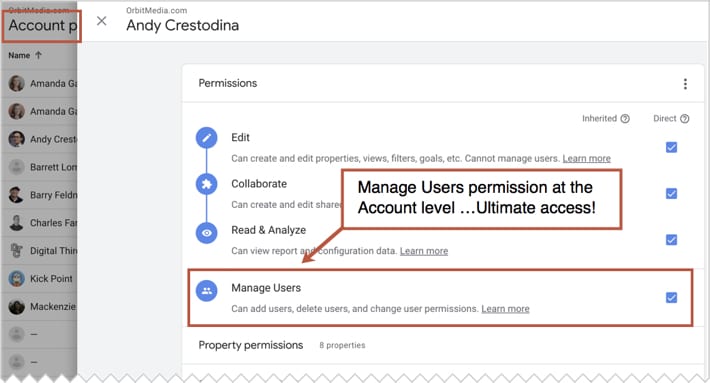
The ultimate access for Google Analytics is “Manage Users” permission at the account level.
Here’s how to make sure that your key is the master:
- Click the gear button in the bottom left corner to enter the Admin section
- In the left column (Accounts) click on “User Management”
- Click on your user name
- Look for the blue checkmark in the box next to “Manage Users”
We recommend the login for this master key account is also used for your other big Google accounts:
- Google Tag Manager
- Google Search Console
- Google My Business
- …Google everything else (Optimize, Data Studios, Ads, Surveys, etc.)
This will make it easier for you to jump around without having to switch between accounts. You navigate directly to the other tools within the Google Marketing Platform from within Google Analytics.
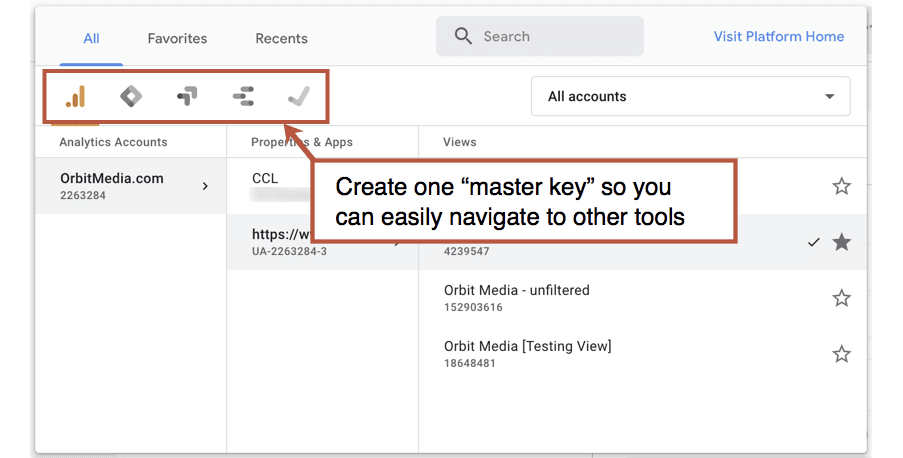
Once you’ve confirmed that you’re in control, you can add, edit and delete access to anyone. Before we get to those instructions, let’s review the levels of access and types of permissions.
The 3 Analytics access levels
As we saw, the admin section has three columns: Accounts, Properties and Views. Each has its own button for “User Management.”
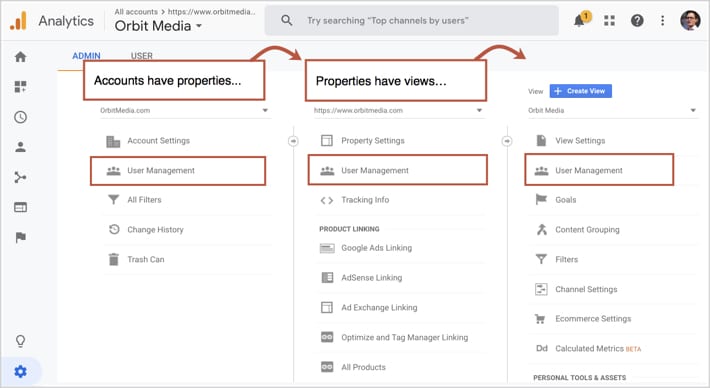
Grandpa: The Account
The column on the left is Accounts, but there is usually just one. This is grandpa. It’s the big one. Grant this level of access only for trusted partners, because…
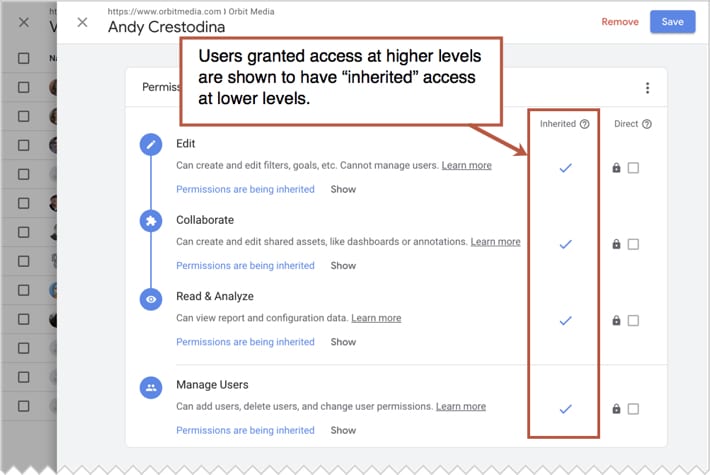
Access granted to the account automatically grants access to all properties and views.
Parents: The Properties
The column in the center is Properties. Usually a property is a website or a mobile app. For most businesses, there’s just one, the company website. This level of access is appropriate for any digital marketing partner.
Access granted to a property automatically grants access to all the views for that property.
The Kids: Views
There should be at least two views for any property. One view with filters and another with the raw, unfiltered data. Because data can never be changed once it enters Analytics, a view of unfiltered view is good to have, just in case someone screws up your filters.
Giving someone access to just one view is the most restrictive, granted to someone you don’t fully trust with your data.
Access granted to a specific view has no access to other views.
When you look at user access to a view, you can see if that access was “inherited” from the property or account level. When you give access to grandpa, they inherit access to the parents and all the kids.
The 4 types of permissions
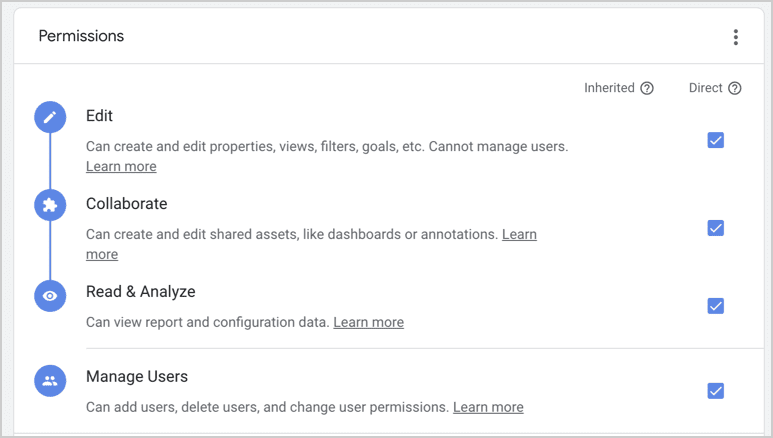
Within each level in this hierarchy, you may grant users four types of permissions.
-
- Edit
Allows the user to create and edit filters and goals and change settings. Users with this permission at the account level can also create new properties and views. - Collaborate
Allows the user to create and share dashboards, annotation, segments and saved reports. Really not a big deal. They can’t break anything. - Read & Analyze
Look but don’t touch. They can see reports but they can’t change or save anything. - Manage Users
They can add/delete users and change user’s permission. Anyone with this level of access can remove anyone else, including you. Trust is a two-way street.
- Edit
So before we share Google Analytics access, here’s a quick guide with suggestions for levels and permissions, from the highest level of trust to the lowest…
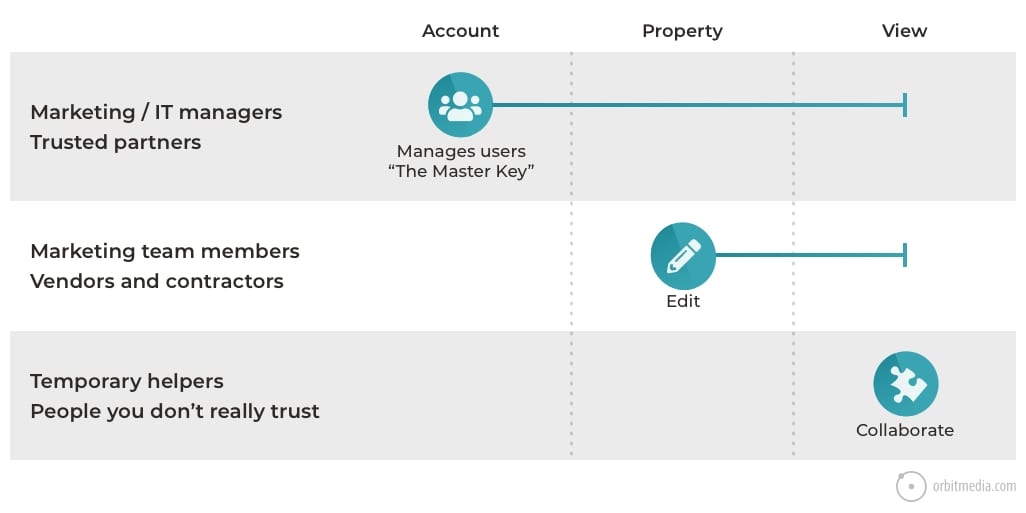
For the step-by-step instructions below, we’ll use the highest level but use your judgment.
How to grant access to Google Analytics
Here is how to share your Google Analytics with anyone, provided they have an email address registered as a Google Account (no, you do not need to use a Gmail account to access Google Analytics).
- Log into Google Analytics
- Click on the gear icon in the lower left to access the Admin section
- In the Account column, click User Management
- Click the blue plus button in the top right to add a new user, then click Add users
- Enter the users email address
- Check the Manage Users checkbox in the bottom right
- Click the Add button in the top right
That’s it. If you left the “notify new users by email” box checked, then they’ll get an email letting them know they can get in. Next time they log into Google Analytics, they’ll be able to see your Google Analytics account in their account list.
Be selective
See anyone in there who doesn’t need access? Remove them. Don’t even hesitate. If they need access, they’ll be in touch and you can add them again in minutes.
It’s likely that there are a ton of old users in your account. Take a look and clean it up!
Related: How to Set Up Google Analytics in 52 Clicks (video)

